To win Every Argument
Wednesday, 18 November 2020
Resume Secrets Exposed
Resume Secrets Exposed
Interview Secrets
Interview Secrets Exposed PDF Book
Oracle Business Intelligence Enterprise Edition (OBIEE)
02. BI PUBLISHER
04. INFORMATICA
06. OBIEE 11G ADVANCED TRAINING
01 OBIEE Practitioner Level
02 OBIEE Learner Level
03 OBIEE Specialist Level
Oracle Business Intelligence Enterprise Edition (OBIEE) is a Business Intelligence (BI) tool by Oracle Corporation. Its proven architecture and common infrastructure producing and delivering enterprise reports, scorecards, dashboards, ad-hoc analysis, and OLAP analysis provides a rich end-user experience.
Tuesday, 10 November 2020
Error in Installing XAMPP On Windows-10 UAC Warning Message Solution fix
Installing XAMPP On Windows 10 & User Account Control (UAC) Warning Message
How To work on UAC when Installing XAMPPThere are two things you need to check:
Ensure that your user account has administrator privilege.
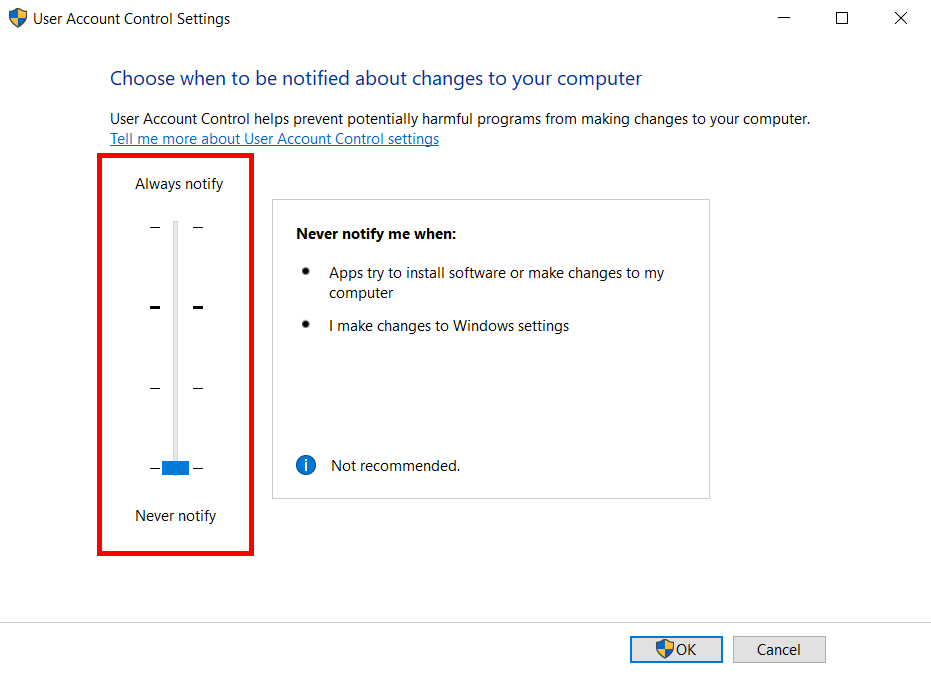
Disable UAC (User Account Control) as it restricts certain administrative function needed to run a web server.
To ensure that your user account has administrator privilege, run lusrmgr.msc from the Windows Start > Run menu to bring up the Local Users and Groups Windows.
Double-click on your user account that appears under Users, and verifies that it is a member of Administrators.
To disable UAC (as an administrator), from Control Panel:According to the instruction they had given I simply went to
- Start Menu –> Control Panel–> In the Control Panel search box just type User Account Control.
- Then you will get the results among which I found;
- “Change User Account Control Settings”
 |

Saturday, 3 October 2020
Infomation
Useful Alerts
❇️ COVID Highlights:
▪️ Recovery rate improves to 81.25%
▪️ ICMR: India conducts a total of nearly 6.62+ crore tests
❇️ Parliament passes 3 labour code Bills
▪️ The Occupational Safety, Health and Working Conditions Code 2020, seeks to amend the laws regulating the occupational safety
▪️ The Industrial Relations Code 2020, aims at amending the laws relating to Trade Unions
▪️ The Code on Social Security, 2020 seeks to amend the laws relating to social security of the employees
❇️ DRDO successfully conducts test fire of Laser Guided Anti Tank Guided Missile from MBT Arjun at KK Ranges (ACC&S)
❇️ Parliament passes J&K Official Languages Bill, 2020
▪️ The bill makes Kashmiri, Dogri, Hindi, English and Urdu as the official language of the Union Territory of J&K
❇️ Over 50 crore workers to benefit from labour reform bills: Union Minister for Labour and Employment Santosh Gangwar
❇️ Railway targets to complete 100 % electrification of its broad gauge routes by 2023
❇️ The elderly are vulnerable to COVID-19 and they need to be protected in these times. Support them and monitor their health regularly.
Wednesday, 30 September 2020
ns2
NS2 INSTALLATION ON UBUNTU 16.04
http://sourceforge.net/projects/nsnam/files/allinone/ns-allinone-2.35/ns-allinone-2.35.tar.gz/download
2) Extract the downloaded zip file 'ns-allinone-2.35.tar.gz file' to desktop.
3) Now you need to download some essential packages for ns2,these packages can be downloaded by using the following commands : applications>accessories>terminal or dashhome>terminal
then type the below lines one by one on the terminal window
"sudo apt-get update"
"sudo apt-get dist-upgrade"
"sudo apt-get update"
"sudo apt-get gcc"
"sudo apt-get install build-essential autoconf automake"
"sudo apt-get install tcl8.5-dev tk8.5-dev"
"sudo apt-get install perl xgraph libxt-dev libx11-dev libxmu-dev"
4) Now change your directory(here i have already extracted the downloaded files to desktop,so my location is desktop) type the following codes in the command window to install NS2.
cd Desktop
cd ns-allinone-2.35
./install
The installation procedure will take a few minutes..........
5) After completing the installation type the following command in the command window
gedit ~/.bashrc
6) Now an editor window appears,please copy and paste the follwing codes in the end of the text file (note that '/home/gnit/Desktop/ns-allinone-2.35/octl-1.14' in each line in the below code should be replaced with your location where the 'ns-allinone-2.35.tar.gz'file is extracted)
# LD_LIBRARY_PATH
OTCL_LIB=/home/gnit/Desktop/ns-allinone-2.35/otcl-1.14
NS2_LIB=/home/gnit/Desktop/ns-allinone-2.35/lib
X11_LIB=/usr/X11R6/lib
USR_LOCAL_LIB=/usr/local/lib
export LD_LIBRARY_PATH=$LD_LIBRARY_PATH:$OTCL_LIB:$NS2_LIB:$X11_LIB:$USR_LOCAL_LIB
# TCL_LIBRARY
TCL_LIB=/home/gnit/Desktop/ns-allinone-2.35/tcl8.5.10/library
USR_LIB=/usr/lib
export TCL_LIBRARY=$TCL_LIB:$USR_LIB
# PATH
XGRAPH=/home/abhiram/Desktop/ns-allinone-2.35/bin:/home/gnit/Desktop/ns-allinone-2.35/tcl8.5.10/unix:/home/gnit/Desktop/ns-allinone-2.35/tk8.5.10/unix
NS=/home/gnit/Desktop/ns-allinone-2.35/ns-2.35/
NAM=/home/gnit/Desktop/ns-allinone-2.35/nam-1.15/
PATH=$PATH:$XGRAPH:$NS:$NAM
7) Save and close the text editor and then type the following command on the terminal
source ~/.bashrc
8) Close the terminal window and start a new terminal window and now change the directory to ns-2.35 and validate ns-2.35 by executing the following command ( it takes 30 to 45 minutes)
cd ns-2.35
./validate
9) If the installation is successful, then you will be able to see % at the command prompt while typing the following command
ns
10) Now type
exit
Steps for installing MyPaint on Ubuntu
Detailed Instructions:
Step 1
sudo apt-get update -y
Step 2
sudo apt-get install -y mypaint


