
Project 1: Photorec (10 Points)
What You Need for This Project
- A Windows machine, real or virtual
Dowloading the Image File
Right-click the link below and save the file on your desktop. This is a forensic image from a digital camera which contains deleted images. It was originally posted on digitalcorpora.org, but it vanished from there so I put a copy on my own website.
http://samsclass.info/121/proj/nps-2009-canon2-gen6.dd
Preparing the Data Directories
Create a new folder on the root of C: with your name on it: C:\YOURNAME
Copy the nps-2009-canon2-gen6.dd file into the C:\YOURNAME folder.
Create another new folder on the root of C: with your name on it followed by a 2: C:\YOURNAME2
Downloading PhotoRec
On your Windows machine, in a Web browser, go to
http://www.cgsecurity.org/wiki/TestDisk_Download
Click the green "TestDisk 7.0 Free Download" button.
Click Start, Computer. Navigate to the folder you downloaded that file into, which is probably the Downloads folder.
Right-click the downloaded file and click "Extract All..", Extract.
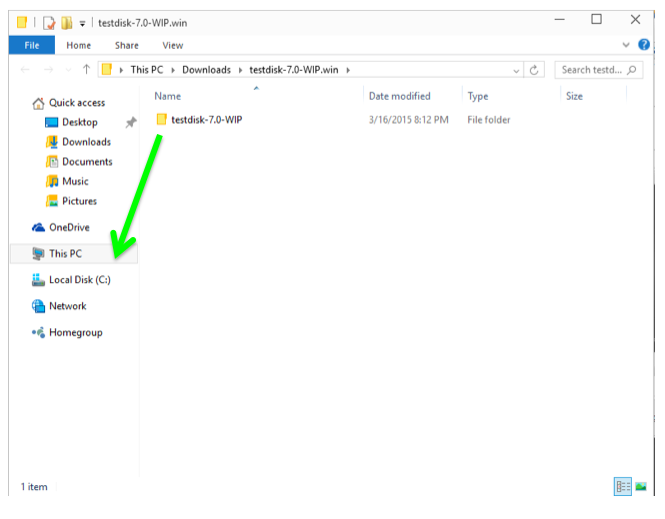
Drag the testdisk-7.0-WIP folder and drop it on the root of C:, as shown below.
Click Start, type CMD, and press Shift+Ctrl+Enter to open an Administrator Command Prompt.
Execute these commands, changing the foldername in the second command to the name you assigned to your folder:
A Command Prompt window opens with a text-only Photorec interface, as shown below:cd \testdisk-7.0-WIP
photorec_win C:\YOURNAME\nps-2009-canon2-gen6.dd
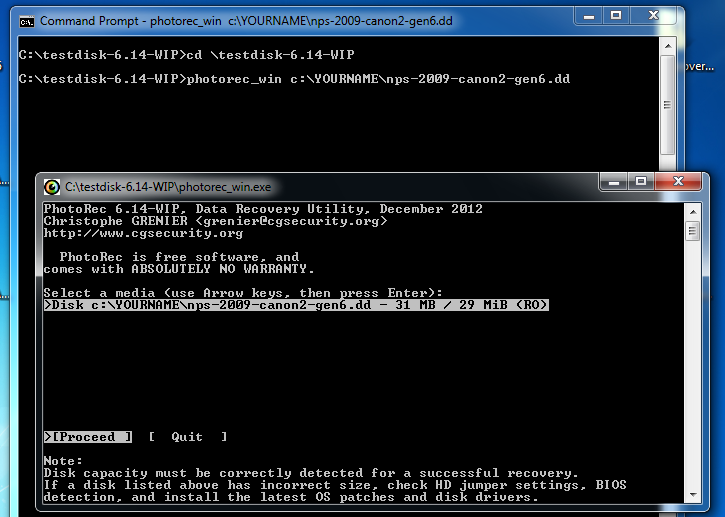
Click in the Photorec window, and press Enter to accept the default selection of the nps-2009-canon2-gen6.dd file.
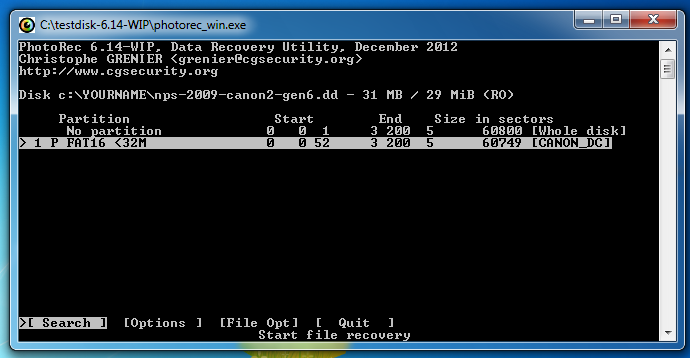
The next screen asks you which partition to search, as shown below. Press Enter again to accept the default selection.
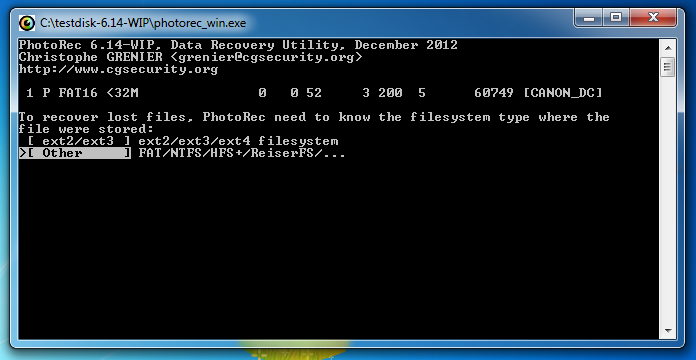
The next window asks what the file system is. It's usually FAT for Canon SD cards, so press Enter to accept the default choice.
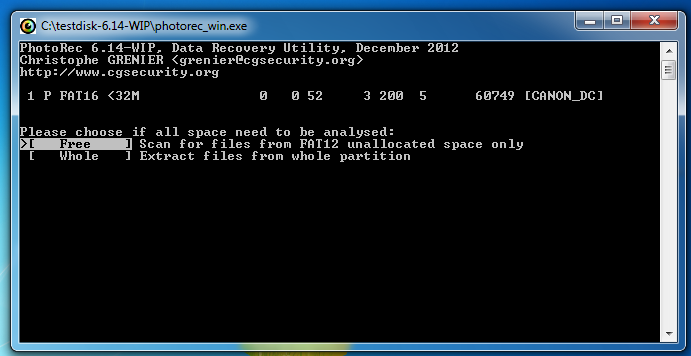
In the next window, press Enter to search unallocated space only. We don't need to recover the images that are still intact.
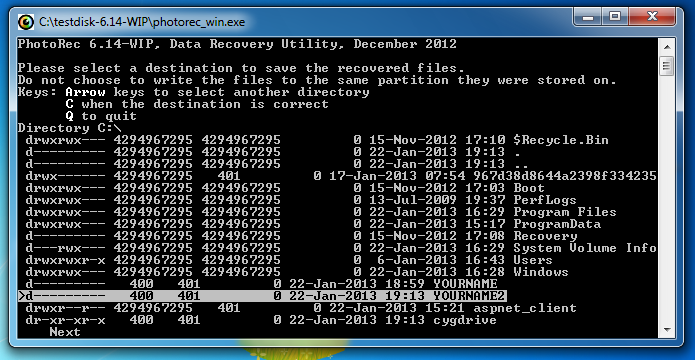
The next window asks where to store the recovered files. This is a really clumsy interface--press the left-arrow key once on the keyboard to move to C: and press the down-arrow key till the C:\YOURNAME2 folder is highlighted, as shown below. Then press Enter.
In the next window, press C.
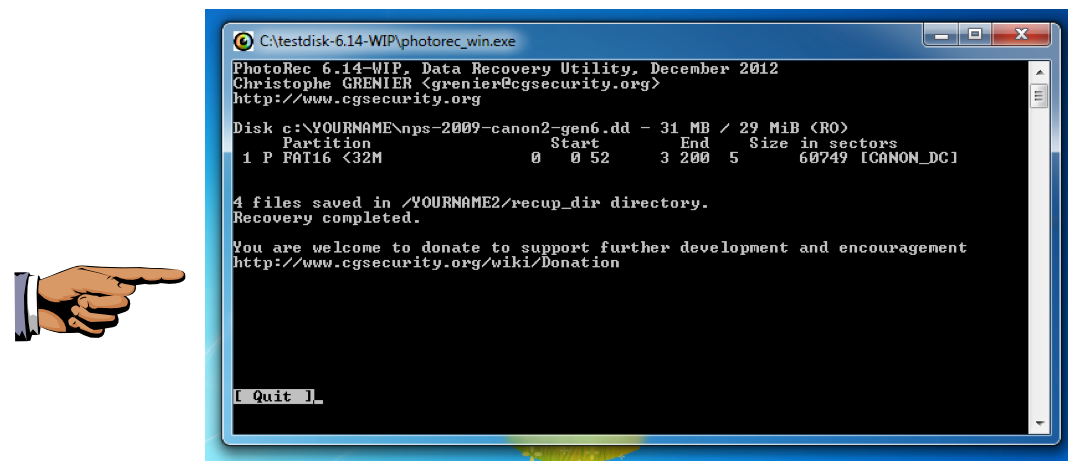
The files are recovered, and listed as shown below:
Saving a Screen Image
Make sure your screen shows "4 files saved", as shown above.
Press the PrintScrn key in the upper-right portion of the keyboard. That will copy the whole desktop to the clipboard.
YOU MUST SUBMIT A FULL-SCREEN IMAGE TO GET FULL CREDIT!
Open Paint and paste in the image.
Save the image with the filename "Your Name Proj 6". Use your real name, not the literal text "Your Name".
Viewing the Recovered Files
Click Start, Computer.
Open the C:\YOURNAME2\recup_dir.1 folder.
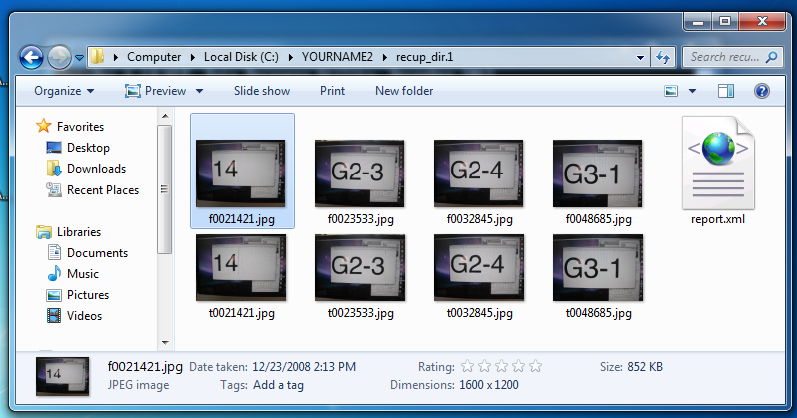
You see four recovered images, a report, and four thumbnail versions, as shown below.
Turning in your Project
Project 2: Using EnCase (15 pts.)
What You Need for This Project
- A Windows computer, real or virtual
- The instructions below assume you are using Windows 7 as set up in the S214 lab.
Downloading the EnCase Demo File
You can get it from this page. The username and password were given to you in class.
Downloading the Virtual Machines
The file is named encasedemo.7z and it is 960 MB in size. It's on the VMs drive on the machines in S214--you can copy it to a USB stick there, which will be faster than downloading it.
Extracting the EnCase RAR File
Copy the encasedemo.rar file from the DVD to your computer. Right-click the encasedemo.rar file and click 7-zip, 'Extract to "encasedemo\"'.
If there is no 7-zip option, you need to do wnload 7-zip from 7-zip.org and install it.
Launching the EnCaseDemo
Open the encasedemo file. Double-click EnCaseDemo.exe
A decorative box appears, as shown below. Click the yellow dot to the left of the words "Run EnCase Demo".
In the encasedemo folder, find the "Hunter XP.E01" file. Drag it and drop it into the "EnCase Evaluation Version" window.
In the "Case Options" box, enter your name as the "Examiner Name" and click "Finish".
If one or more boxes pops up asking to create folders, allow that.
In the encasedemo folder, find the "MS E-mail Files.E01" file. Drag it and drop it into the "EnCase Evaluation Version" window.
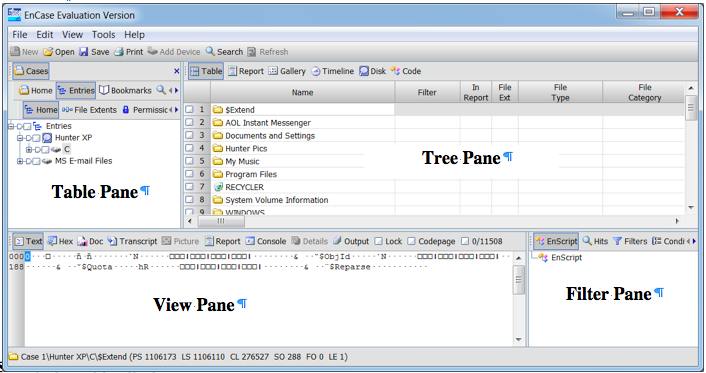
EnCase Layout
There are four panes in the EnCase main window:- Table Pane - this is where you select the device or folder to examine
- Tree Pane - shows files and folders in the current directory
- View Pane - shows the current file or folder in Text, Hex, or many other views
- Filter Pane - shows results from a search or filter
Views in the Tree Pane
In the Table Pane, expand "Hunter XP" and click C to select the C: drive.
The Tree Pane shows the files in the root of C:. Scroll down and click boot.ini.
Try all the views in the Tree pane: Table, Report, Gallery, Timeline, Disk, and Code.
Searching for Email
In the top center of the "EnCase Evaluation Version" window, click the Search button.
In the Search box, on the right side, click the "Search for email" box, and check all the types of email. On the left side, clear all the check boxes, as shown below.
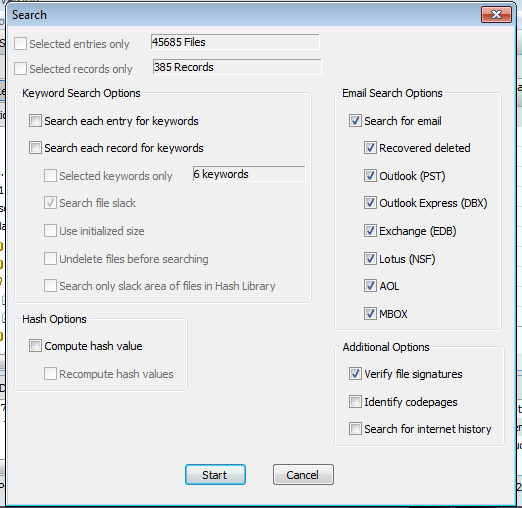
Click the Start button.
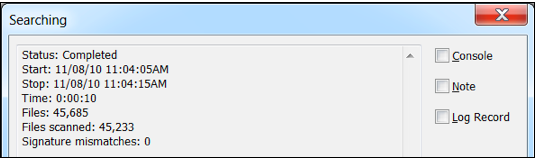
The search runs, with two little progress bars showing in the lower right of the "EnCase Evaluation Version" window. The search should only take about two minutes.
When the search completes, a box pops up saying "Completed" as shown below. Click OK.
Viewing the Search Results
From the "EnCase Evaluation Version" menu bar, click View, "Cases Sub-Tabs", Records.
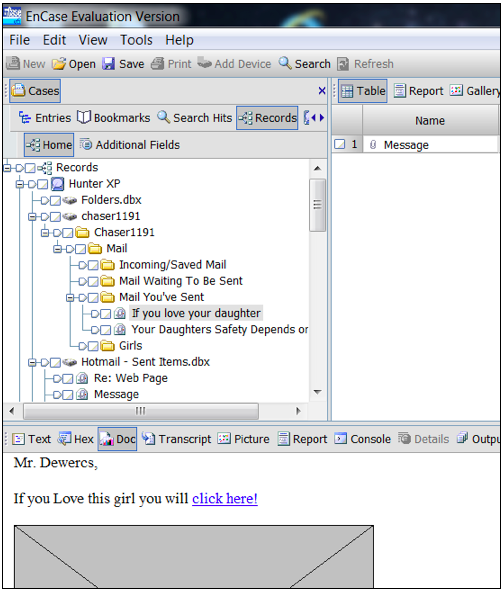
You should see a tree of entries in the Table Pane. Use the keyboard down-arrow to look at each one and read the emails in the View Pane in the lower left. To see the friendliest view, click the Doc tab in the lower pane.
As you can see, this case involves a plot to kidnap a daughter.
Finding the License Plate Number
Search through the emails and find a photograph of a person (perhaps the intended victim) putting gas in a car. Find the license plate number of that car and write it down.
To make a photo larger, drag the border of the lower pane up.
Searching the Internet History/Cache
In the top center of the "EnCase Evaluation Version" window, click the Search button.
In the Search box, on the right side, clear the "Search for email" box, as shown below.
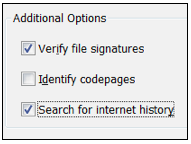
At the bottom, check the "Search for internet history" box. Click the Start button.
When the Searching box pops up, saying "Completed", click OK.
Viewing the Search Results
From the "EnCase Evaluation Version" menu bar, click View, "Cases Sub-Tabs", Records.
In the Table Pane, expand "Hunter XP" and expand C.
Expand "Internet Explorer (Windows)".
Click Cache to select it.
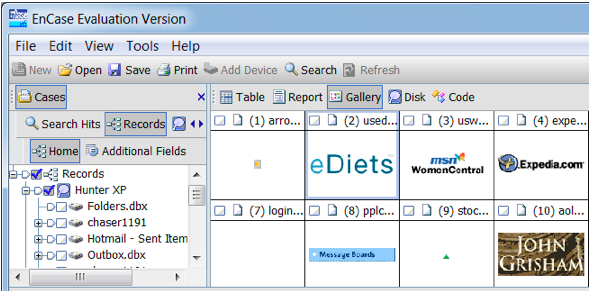
In the Tree Pane, click Gallery. A grid showing the images from the cache appears, as shown below.
Finding the Map
Search through the images and find the map shown below. When you find it, select this image in the Tree Pane and select Picture in the View Pane, so you can see the small version of the map in the Tree Pane and the full size map in the View Pane.

Saving a Screen Image
Make sure your screen shows the map image shown above. Save a screen image it with the filename "Your Name Proj 11".
Turning in your Project
Project 3: Introduction to FTK (15 pts.)
What You Need for This Project
- A Windows virtual machine
Starting your Virtual Machine
Start your virtual machine as you did in the previous project.In the virtual machine, click Start, "Turn Off Computer", "Turn Off". Wait until the guest operating system shuts down.
Adding a Small Hard Disk to your Virtual Machine
Start VMware Player again. On the right side, you see a Windows virtual machine in a State: of "Powered Off", as shown below.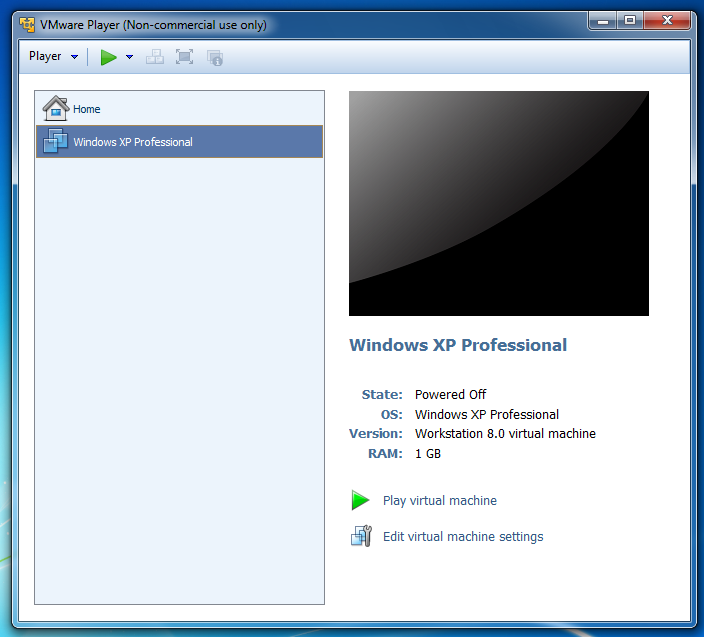
On the right side, click "Edit virtual machine settings".
In the "Virtual Machine Settings" box, click the Add... button. If a "User Account Control" box pops up, click .
In the "Add Hardware Wizard" box, accept the default selection of "Hard Disk" and click the Next button, as shown below:
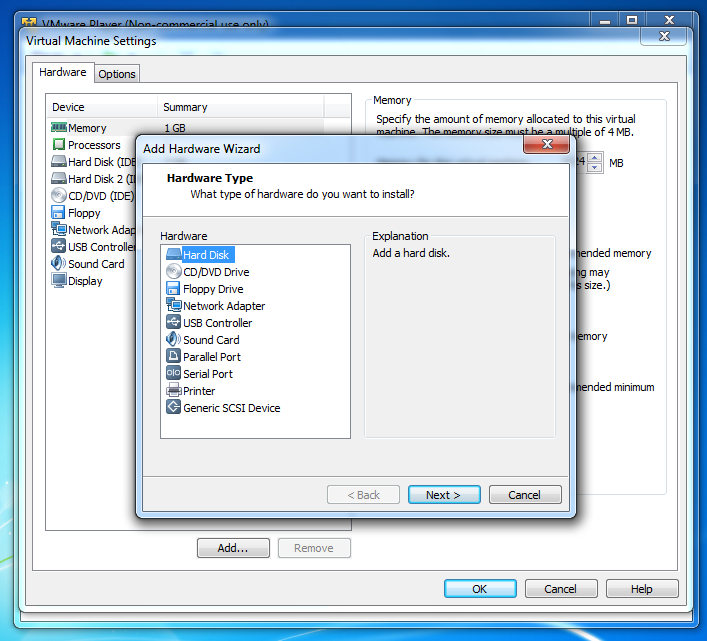
In the "Select a Disk" box, accept the default selection of "Create a New Virtual Disk" and click the Next button.
In the "Select a Disk Type" box, accept the default selection of "IDE (Recommended)" and click the Next button.
In the "Specify Disk Capacity" box, set the "Maximum disk size (GB)" to 0.1 and check the "Allocate all disk space now" as shown below. Click Next.
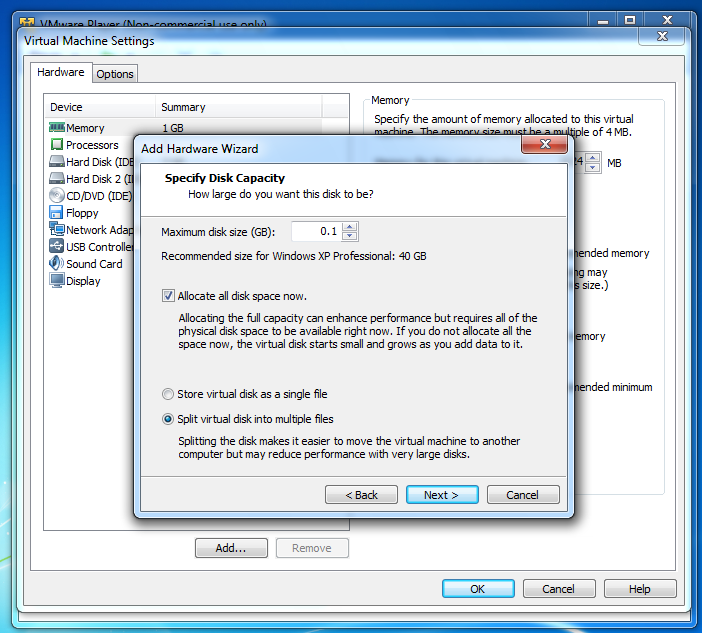
In the "Specify a Disk File" box, accept the default selection and click Finish. In the "Virtual Machine Settings" box, click OK.
Forensically Cleaning a Disk
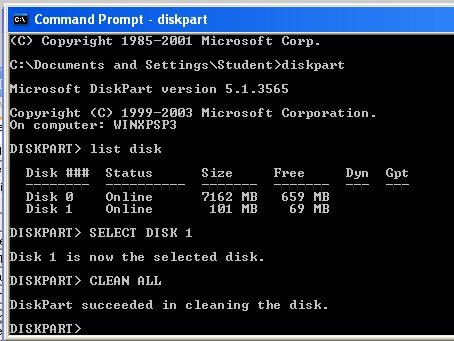
Click Start, right-click "My Computer", and click Manage.You should see your second small disk labelled "Disk 1", as shown below.

Click Start, Run. Type CMD and press Enter.
Execute these commands to clean your second disk. Be careful not to erase the wrong disk!
DISKPARTLIST DISK
SELECT DISK 1
CLEAN ALL
Downloading FTK
We are using a really old version of FTK that has a free demo mode. It's so old, you can't get it from AccessData anymore--you'll get it from my Website.Download FTK from this link (50 MB):
http://samsclass.info/121/proj/FTK-Forensic_Toolkit-1.81.6.exe.7z
This is a 7-zip archive. If you don't have 7-zip, get it here:
Right-click the FTK-Forensic_Toolkit-1.81.6.exe.7z file and click 7-Zip, "Extract Here".
A file appears, named "FTK-Forensic_Toolkit-1.81.6.exe".
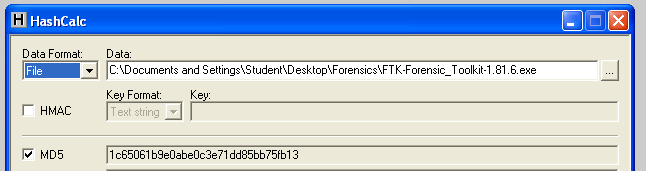
Verifying the Hash
Here's a screen shot from the old AccessData Web page when they provided this version: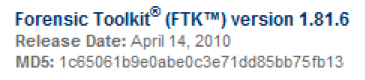
To test your file, you need Hashcalc. If you don't have Hashcalc, get it here:
http://www.slavasoft.com/hashcalc/
Open Hashcalc.
Drag the "FTK-Forensic_Toolkit-1.81.6.exe" file and drop it on the Hashcalc window.
You should see the correct hash value, ending in fb13, as shown below:
Installing FTK
Double-click the "FTK-Forensic_Toolkit-1.81.6.exe" file and install the software with the default options.Starting FTK
After installation, FTK will launch.When you get an Error box saying "No security device was found...", click No.
When you get an Error box saying "The KFF Hash library file was not found...", click OK.
When a box pops up explaining the limitations of the demonstration version, click OK.
Starting a New Case
In the "AccessData FTK Startup" box, accept the default selection of "Start a new case", as shown below, and click OK.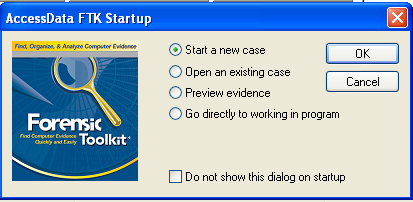
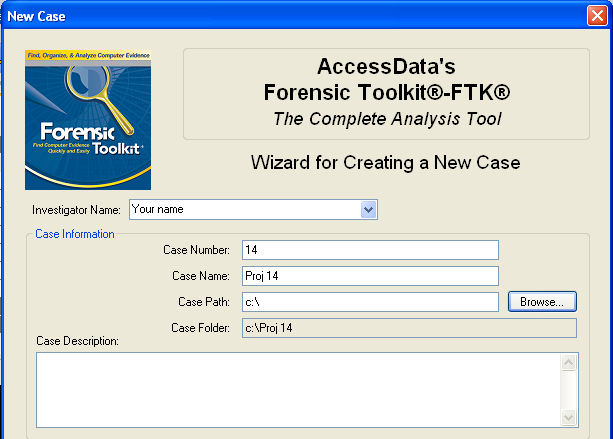
In the screen titled "Wizard for Creating a New Case", fill in the fields as shown below, replacing "Your Name" with your own name. Click Next.
In the screen titled "Forensic Examiner Information", leave the fields blank and click Next.
In the screen titled "Case Log Options", accept the default selections, which will log everything. Click Next.
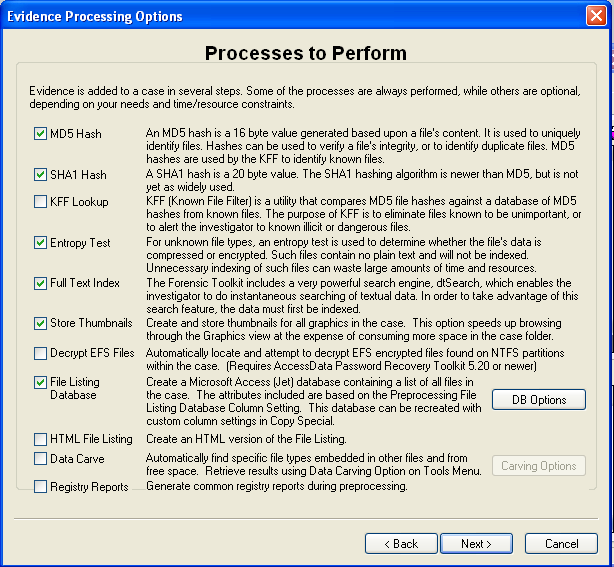
In the screen titled "Processes to Perform", deselect "KFF Lookup" and "Decrypt EFS Files", because those features won't work in the demo version, as shown below. Click Next.
In the screen titled "Refine Case-Default", accept the default of "Include All Items". Click Next.
In the screen titled "Refine Index -Default", accept the default options. Click Next.
Now you see the "Add Evidence" screen, as shown below.
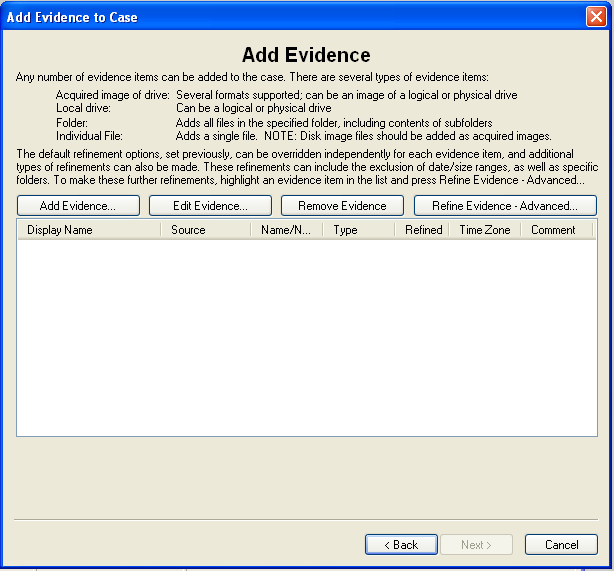
Adding Evidence to the Case
In the "Add Evidence" box, click the "Add Evidence...". button.In the "Add Evidence to Case" box, select "Local Drive", and click Continue.
In the "Select Local Drive" box, click "Physical Analysis" and select the drive "Physical Drive 1", as shown below. Click OK.
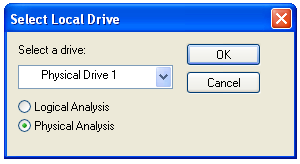
In the "Evidence Information" box, click OK.
In the "Add Evidence" box, click Next.
In the "New Case Setup is Now Complete" box, click Finish.
A "Processing Files..." box appears. Wait till the processing completes--it won't take long if you have a small drive.
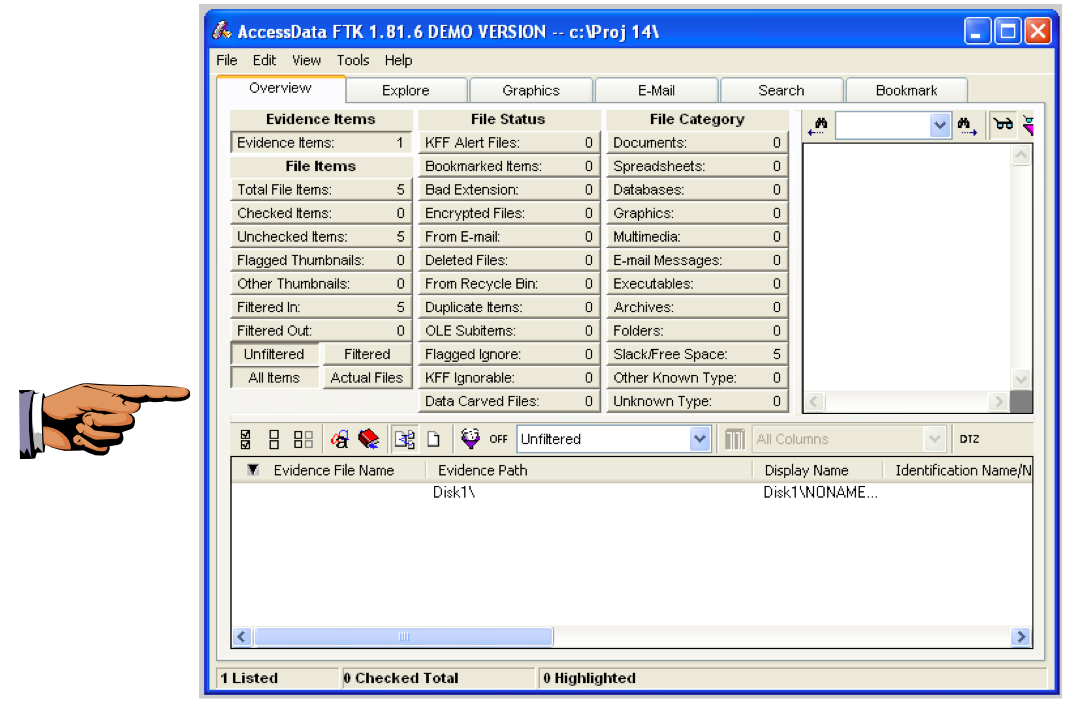
You should now see a screen like that shown below, showing "Evidence Items: 1" in the upper left portion of the window.
Saving a Screen Image
Make sure your screen shows the "Evidence Items: 1" message.Capture the whole desktop with the PrntScn key.
YOU MUST TURN IN THE WHOLE DESKTOP TO GET FULL CREDIT!
Save the image with the filename "Your Name Proj 12".
The FTK Window
Look in the upper left of the FTK window. In the "File Items" section, FTK says 'Total File Items" is 5. How can that be, on a totally empty disk?To find out, click the "Total File Items:" button. The lower pane now shows five items, named "DriveFreeSpace1","DriveFreeSpace2","DriveFreeSpace3", etc.
In the bottom pane of the FTK window, click "DriveFreeSpace1". The upper right corner now shows a hexadecimal view of the bytes in that file, as shown below.
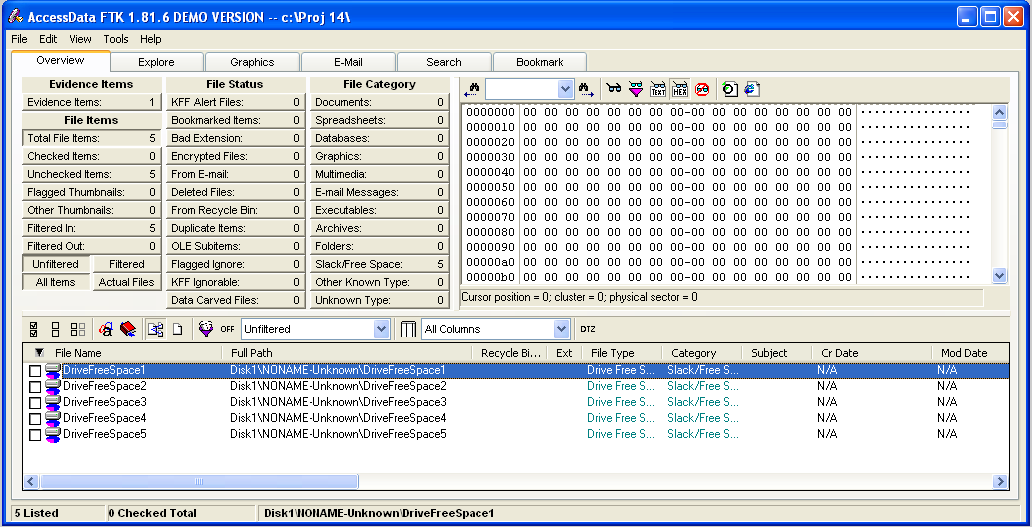
This is just like the HxD utility you used in a previous project. As you can see, the file is empty--it's not really a file at all, because it has no header or footer or file name or any data at all. FTK just breaks empty space up into chunks it calls 'Files" for handling.
To see that the disk is really empty, look at the "File Status" and "File Category" columns in the upper left portion of the FTK window. You can see that FTK was unable to find any usable data in any known format on this disk--it's clean.
Turning in your Project
Project 4: Using FTK (25 pts.)
What You Need for This Project
- A Windows machine, with FTK installed. It can be real or virtual. I used a Windows XP virtual machine.
Downloading the Evidence File
Dowload the file below:Use Hashcalc to calculate the hash of the file you downloaded. It should match the figure below:
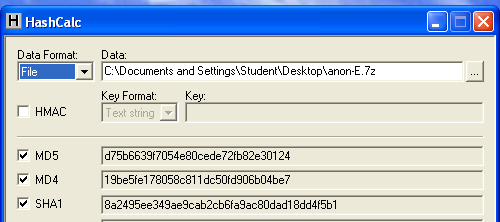
Unzip the file with 7-Zip.
Starting FTK in your VM
Double-click the "FTK Forensic Toolkit" icon on your desktop. ( When you get an Error box saying "No security device was found...", click No.When you get an Error box saying "The KFF Hash library file was not found...", click OK.
When a box pops up explaining the limitations of the demonstration version, click OK.
Starting a New Case
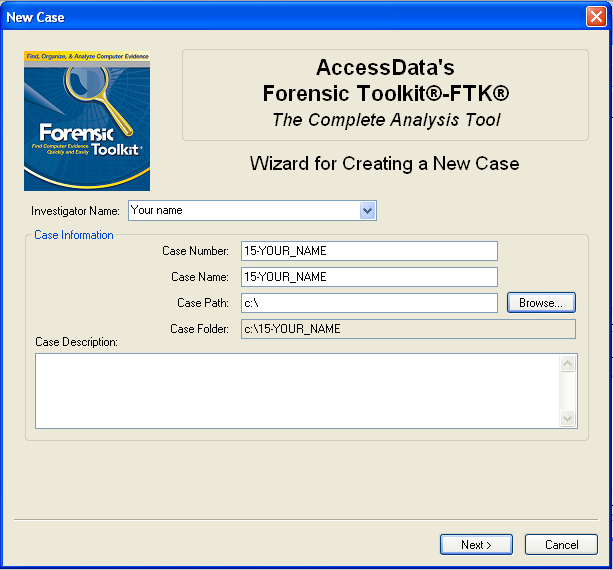
In the "AccessData FTK Startup" box, select "Start a new case" and click OK.In the screen titled "Wizard for Creating a New Case", fill in the fields as shown below, changing "YOUR_NAME" to your own name. click Next.
In the screen titled "Forensic Examiner Information", leave the fields blank and click Next.
In the screen titled "Case Log Options", accept the default selections, which will log everything. click Next.
In the screen titled "Processes to Perform", deselect "KFF Lookup" and "Decrypt EFS Files". click Next.
In the screen titled "Refine Case-Default", accept the default of "Include All Items". click Next.
In the screen titled "Refine Index - Default", click Next.
Adding Evidence
In the "Add Evidence" box, click the "Add Evidence...". button.In the "Add Evidence to Case" box, select "Acquired Image of Drive", and click Continue.
In the "Browse for Folder" box, navigate to your Desktop, open the "E" folder, and double-click the anon1a.E01 file.
In the "Evidence Information" box, click OK.
In the "Add Evidence" box, click Next.
In the "New Case Setup is Now Complete" box, click Finish.
A "Processing Files..." box appears. Wait a few seconds for the processing to finish.
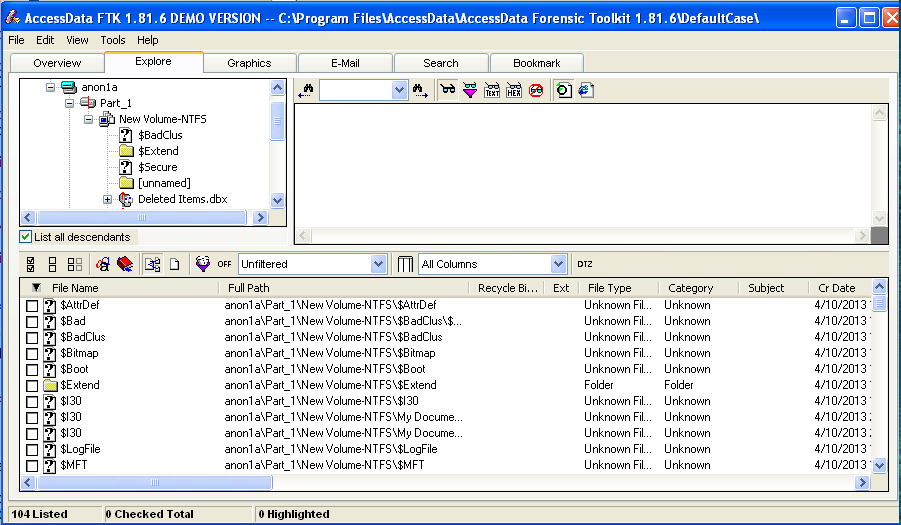
Click the Explore tab.
In the left center, check the "List all Descendants" box. You should see a long list of files, with "104 Listed" in the Status Bar, as shown below on this page.
Case Background
This evidence was seized from a computer found in a room used by a suspected computer hacker from the Anonymous gang.Search Procedure 1: File-by-file
In the lower pane of FTK, click the first item. Look in the upper-right pane to see what's in the file. Press the down-arrow key on the keyboard to move to the next file. The first 20 files contain very little useful information--as you can see, this is not an efficient way to find relevant evidence.Search Procedure 2: Keyword Search
A much better procedure is to use keyword search. FTK is designed to work this way--it makes an index of all the words in the evidence file. Open Notepad and type in the keywords shown in the figure below. Since all we know now is that the case involves Anonymous, the keywords come from the common Anonymous slogans "Expect Us" and "We never forgive, we never forget".
Save this file on your desktop as "keywords.txt".
In FTK, click the Search tab.
Click the Import button.
In the "Import Search Terms" box, navigate to your desktop and double-click the keywords.txt file.
A "Import Search Terms" box pops up, saying 'Do you wish to show items that have 0 hits?". Click No.
Results of the Search
Five of the keywords were found, as shown in the top pane of FTK: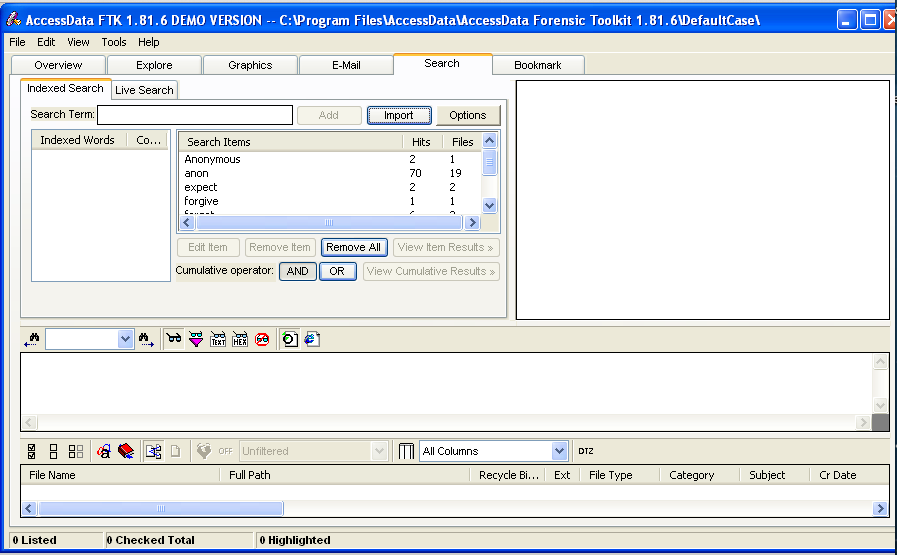
In the "Cumulative Operator" line, click the OR button.
In the "Cumulative Operator" line, click the "View Cumulative Results" button.
In the "Filter Search Hits" box, accept the default selection of "All files" and click the OK button.
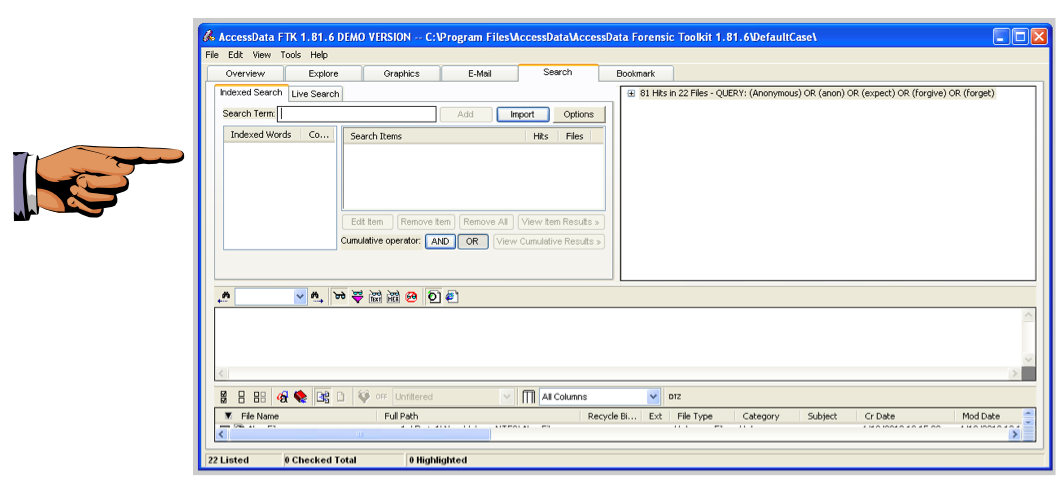
The upper right pane should now show "81 Hits in 22 Files", as shown below.
Saving a Screen Image
Make sure your screen shows "81 Hits in 22 Files".Click on the host machine's taskbar.
Capture your whole desktop with the PrintScrn key.
YOU MUST TURN IN A COMPLETE DESKTOP IMAGE TO GET FULL CREDIT.
Save the image with the filename "Your Name Proj 13a".
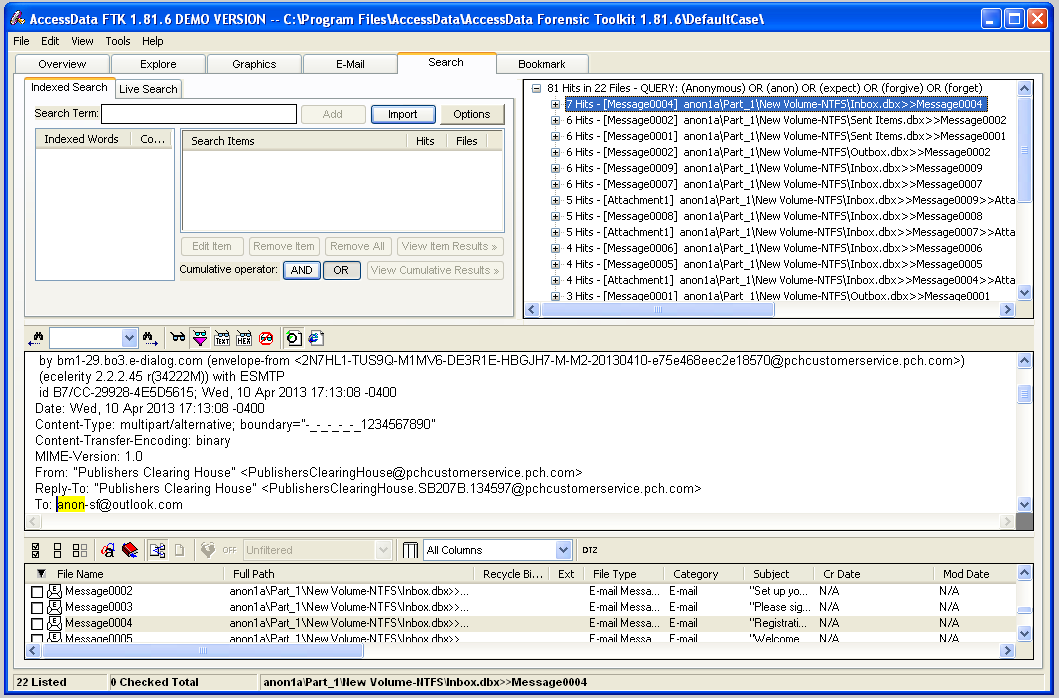
Examining the Hits
Click the first item in the upper-right pane. This is a container, labeled "81 Hits in 22 Files". Expand it by pressing the right-arrow key on the keyboard. Then press the down-arrow to go to the next item, labeled "[7 Hits -- Message004]".Your screen should now look like the image shown below on this page. This file is an email message, and you can read it in the lower-center pane. This is obviously unimportant spam.
Procedure
Here's how to quickly inspect the hits. Refer to the figure below.- In the HITS section at the top right, press the down-arrow key to highlight the next item.
- Examine the PREVIEW in the center of the screen.
- If the file is important, check the box at the left of the shaded line in the FILES section at the bottom of the screen.
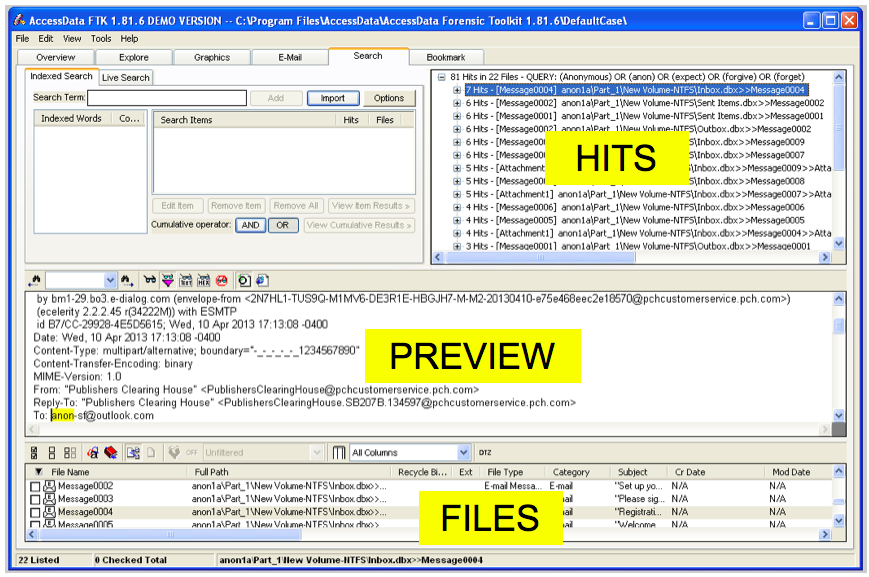
Proceed through all 22 files in this manner.
You should find an email bragging about an obvious crime, and several suspicious files.
Saving a Screen Image
Make sure your screen shows the obviously incriminating email you found.Click on the host machine's taskbar.
Capture your whole desktop with the PrintScrn key.
YOU MUST TURN IN A COMPLETE DESKTOP IMAGE TO GET FULL CREDIT.
Save the image with the filename "Your Name Proj 13b".
Viewing the Images
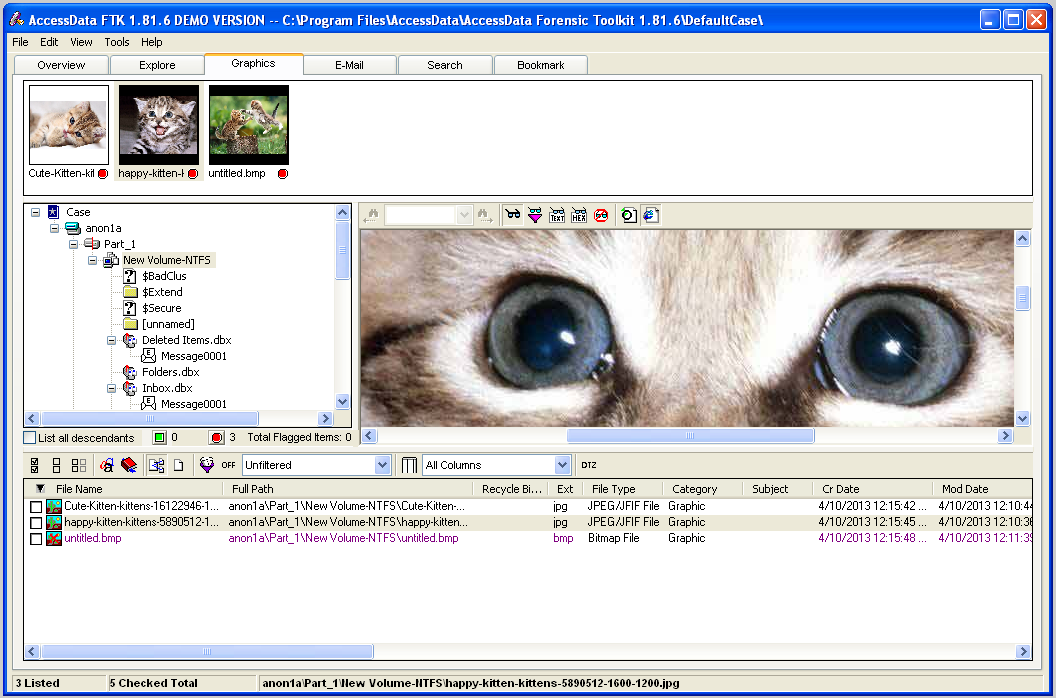
One weakness of the keyword search is that it won't find words in images.To see the images, click the Graphics tab at the top of the FTK window.
In the center left, there is a tree structure showing files and folders. Click the top item, Case, and use the down-arrow to move to the next item.
When you encounter containers, use the right-arrow to expand them.
When you highlight a container that has graphics in it, you will see thumbnails in the top pane, as shown below:
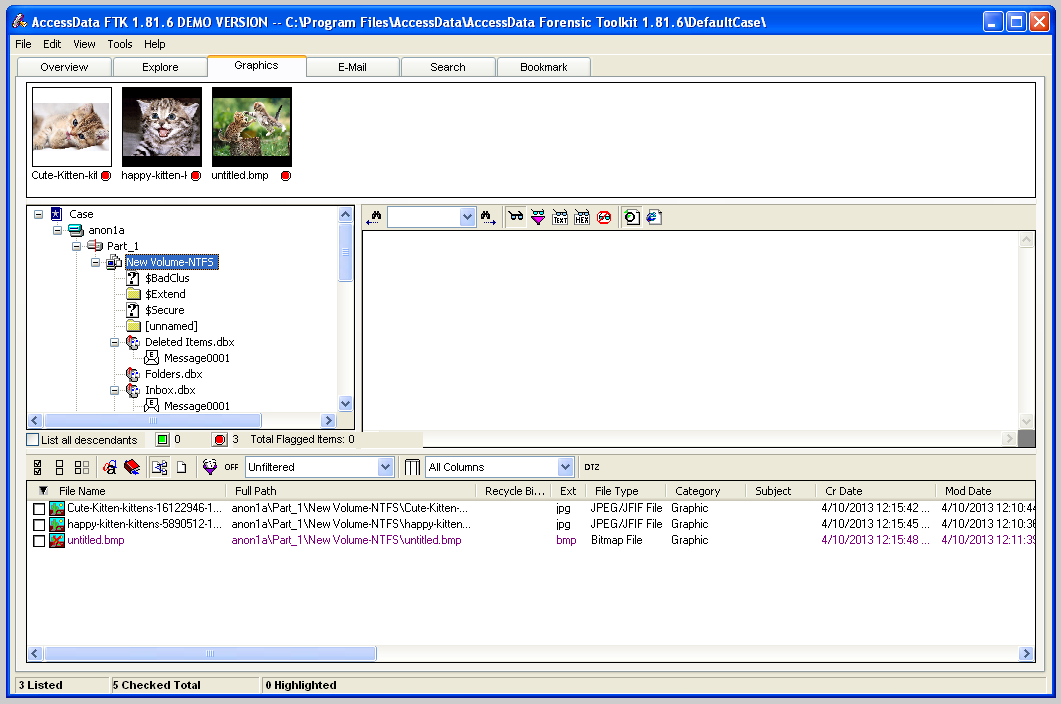
The kittens are not incriminating, but you might want a closer look at them to be sure.
In the top pane, click one of the thumbnails. The image is shown full-size in the center right pane, as shown below:
Continue to examine all the containers until you find suspicious images. Mark all the suspicious images by checking the boxes in the lower pane, just as you did with the email messages.
One of the images shows a defaced Web page. Adjust it so that the defacement is clearly visible.
Saving a Screen Image
Make sure your screen shows the obviously incriminating image you found.Click on the host machine's taskbar.
Capture your whole desktop with the PrintScrn key.
YOU MUST TURN IN A COMPLETE DESKTOP IMAGE TO GET FULL CREDIT.
Save the image with the filename "Your Name Proj 13c".
Making a Report
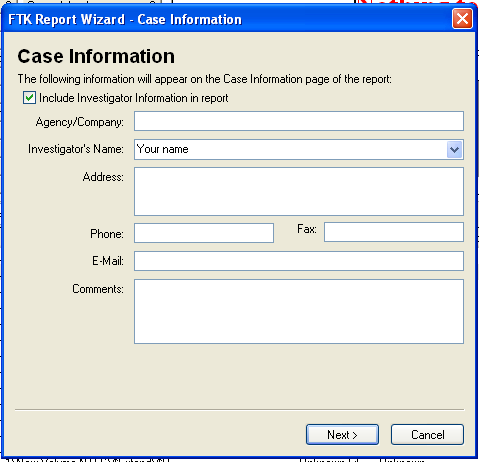
In FTK, from the top menu bar, click File, "Report Wizard".In the "Case Information" screen, click Next, as shown below.
In the "Bookmarks - A" page, click the "Yes, export all bookmarked files" button, as shown below. Then click Next.
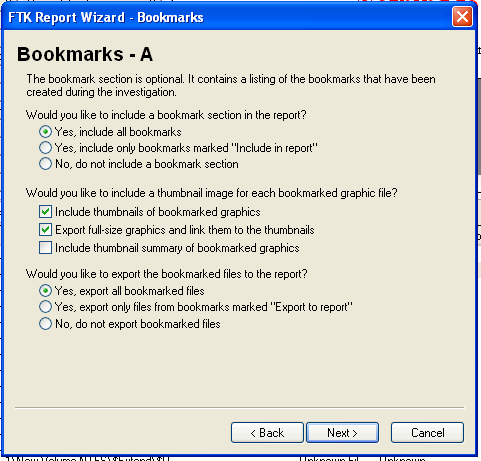
In the "Bookmarks - B" page, click Next.
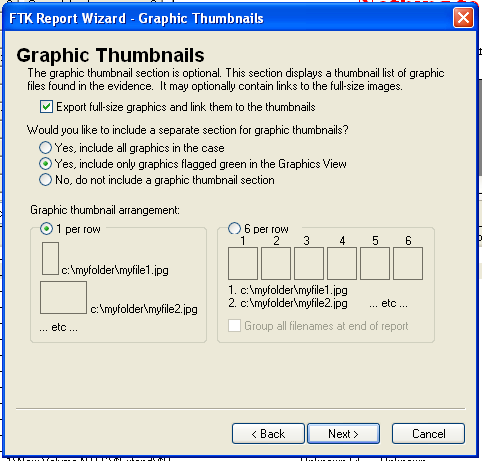
In the "Graphic Thumbnails" page, click "Export full-size graphics and link them to the thumbnails", as shown below. Then click Next.
In the "List by File Path" page, click Next.
In the "List File Properties - A" page, click Next.
In the "Supplementary Files" page, click Next.
In the "Report Location" page, click Finish.
A "Report Wizard" box pops up, asking "Do you wish to view the report?".
Click Yes.
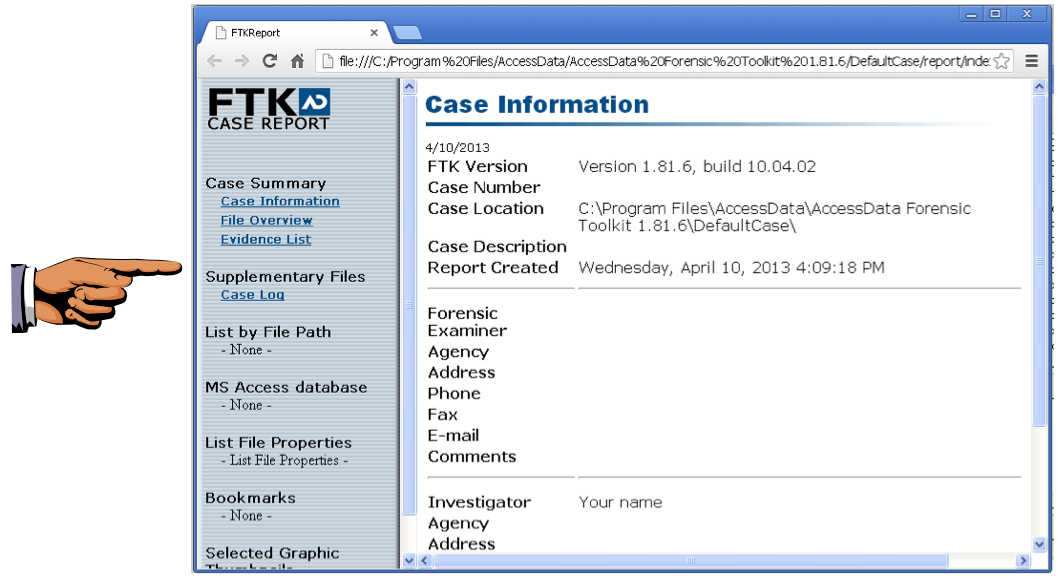
The Report appears, as shown below.
Saving a Screen Image
Make sure your screen shows a report with your name on it as the Investigator, as shown above.Click on the host machine's taskbar.
Capture your whole desktop with the PrintScrn key.
YOU MUST TURN IN A COMPLETE DESKTOP IMAGE TO GET FULL CREDIT.
Save the image with the filename "Your Name Proj 13d".
Exporting the Checked Files
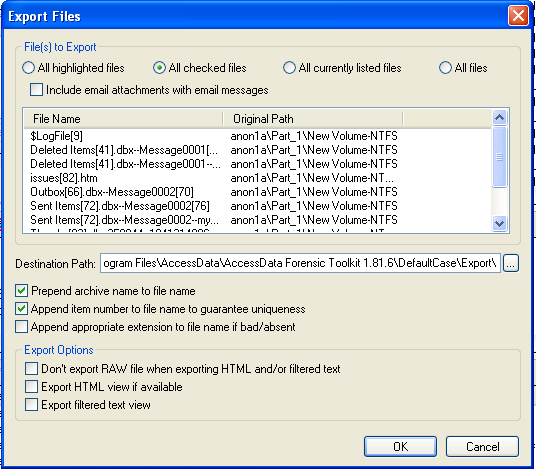
The Report doesn't include the checked files--we need to export them separately.In FTK, from the top menu bar, click File, "Export Files".
In the "Export Files" box, click "All checked files", as shown below. Then click OK.
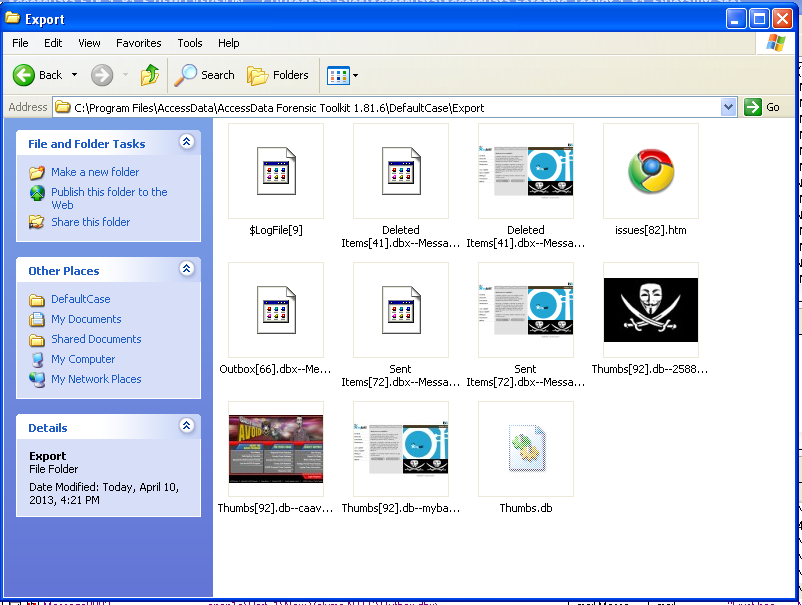
To see the exported files, click Start, Computer, and navigate to the C:\Program Files\AccessData\AccessData Forensic Toolkit 1.81.6\DefaultCase\Export" folder.
The files are there, as shown below.

 Download
No comments:
Post a Comment