Showing posts with label TipsnTricksz. Show all posts

Wednesday 15 July 2015

Friends Tips to Improve your Typing Speed with Simple Techniques 

To improve your typing speed to about 50wpm. Then follow this simple techniques given below to improve your typing speed . Speed Typing is necessary for a common human beings to interact with computers. As every computer users now use mail service and other online services .Speed typing improves your productivity and saves time.


Lesson One :

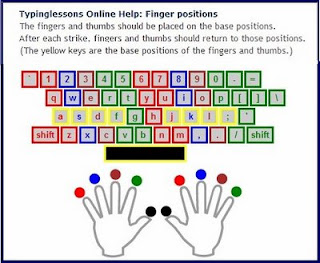
Learn from the Home Keys  A,S,D,F for left hand and J,K,L, ; for right hand  and use your right hand Thumb for Space Key as illustrated in the below diagram and note the corresponding fingers for the letter. This basic lesson of typing .


Lesson Two:

Familiarize with Home Keys by using any of the basic Typing Tutor software's which are available in plenty. A Google Search for a Typing Tutor software will do.No matter which software you use , but try to be proefficient with your Home Keys.Remember you can locate any key on the keyboard from the Home Key.


Lesson Three:

After Familiarizing with ASDF and JKL; proceed to use  ER on the left hand and UI on the right hand as illustrated in the below figure. Note the color associated with the correspoding fingers


Lesson Four:

As mentioned below put some time exclusively to improve your typing speed.Say a solid 15 minutes per day on the morning and evening guarantees you to improve your typing speed significantly.


Lesson Five :

As your familiriaze with the keys ,have an eye on the accuracy and try to  improve this on the side. Remember accuracy in typing is the integral part of  Speed typing.

I hope this simple techiques can improve your typing speed significantly as it did for me.

Tools to manage multiple Twitter account

Twitter is a famous micro blogging service where users express everything by 140 characters message called "Tweet". Twitter is getting popular all over the world where social media is greatly used to propagate and promote products and customer service. Lot of corporates promotion is offered in Twitter and many celebrities too are in Twitter updating their status. In this post we will discuss two online tool to manage your multiple twitter account and make twittering more ease.

1. CoTweet


Cotweet is designed to manage your business activity via twitter. It helps companies to reach customers easily and promotes productivity. It supports to add multiple twitter accounts and helps in assigning tasks between accounts. It also has scheduling tweets, easy interface and tracking the bit.ly clicks using the API feature. Much clearly and neatly designed UI helps everyone to understand its functionality in one shot. Just sign up once free and you will feel the difference how twittering fun and productive too.

2.HootSuite


HootSuite is another excellent productivity to manage the business activity in Twitter. It has its own URL shortening system namely ow.ly and you can get a clear statics about the click made to your URL. The complete analysis of the clicks are given in excellent graphical form. Apart from that managing muliple Twitter accounts HootSuite helps to embedd columns, manage groups, schedule tweets and manage RSS feeds of your blog or site.

Thursday 4 June 2015

Troubleshooting - Windows 8 not detecting CD DVD drive

We have been through several forums and discussion boards stating about an issue with windows 8 out of which the DVD /CD drives no longer get detected. well here is some explanation to it and a way to make it work if it is not working as expected.

http://msdn.microsoft.com/en-us/library/windows/hardware/jj591582.aspx

ZPODD Zero Power Optical Disk Drive

Zero Power Optical Disk Drive (Zero Power ODD or ZPODD) is one of many new Windows 8 features introduced for power efficiency. On a system enabled with ZPODD, when Windows 8 detects that there is no media in an optical drive, power to the optical drive is cut off. As soon as the user attempts to use the optical drive, power to the optical drive automatically resumes and the user will be able to use the optical drive immediately, unaware that the power to the device was ever turned off. Everything happens in the background and normal user interaction is not affected. ZPODD applies only to optical drives that use the slimline SATA connector and is typically found on laptops. Some servers and desktops also use a slimline SATA connector for optical drives.
In order for ZPODD to work, the ZPODD feature must be supported by the optical drive, the motherboard, and the BIOS.
In some cases even after inserting a Disk in the drive, the drive icon still doesn't show up. you may follow the steps below to make that work.


Step 1. Run Command Prompt as an  Administrator. Directly type cmd in the new Start Screen(a.k.a Windows 8 Metro UI) and press cltr+shift+enter.
 
Now copy the following , right click command prompt and select paste and the Enter.
reg.exe add "HKLM\System\CurrentControlSet\Services\atapi\Controller0" /f /v EnumDevice1 /t REG_DWORD /d 0x00000001
 
Step 2.Reboot the system 

 
Step 3.Verify if the problem has been resolved.

Tips on how to Install Windows XP from Pen Drive without third party software

We have seen people looking for a simple solution to install Windows XP from pen drive just like they can now install windows Vista , 7 and windows 8.

Well, i know one such solution exactly and i use it personally. but i never shared it though... so here it is , and i hope this will help.

Benefits:

  1. Takes less than 5 minutes to install OS.
  2. Image Based installation much similar to Vista, 7 and 8 installation.
  3. Tools used are from Microsoft.(ImageX).

So let's get started. i assume that you know computer and OS installation basics and have read the earlier article for preparing a bootable window Vista,7 or 8 Pen drive in previous post of my blog.

Let me explain first, given below are the steps that we will use for preparation.

Step1 : Prepare Window Vista, Window 7 or windows 8 Boot able pen drive Link -Boot able Pen drive ints
Step2 : Install windows XP on a a test pc.
Step3 : Capture Windows XP image from C: partition of test pc.(using imageX.exe)
Step4 : Once the image is captured, it can be used for installation on other desktops or laptops etc.


Objective: Install windows XP from a bootable (windows) pen drive.

Step 1: Click here(bootable instructions see previous post) and follow instructions to create a bootable windows installation drive.
Step 2: Install a fresh copy of windows XP on a desktop computer using standard procedure. do not install any drivers or software. Shutdown your computer after first restart.
Step 3: We will now need Microsoft ImageX

Imp Note :(Microsoft ImageX tool for windows.(download it from Microsoft site here) ImageX is a very tiny application which comes as part of WAIK (windows automated installation kit). download the latest iso file from the link here. its is a big image file but worth the download because we will use ImageX.exe for several different purposes. )

Time to capture the freshly installed windows XP image from C: partition. to do this follow the steps below.
  • Copy ImageX to bootable pen drive created during the Step1.
  • Boot from bootable pen drive
  • On the setup screen Press Shift+F10 to open command prompt.
  • Now from command prompt go to pen drive.
  • Now Type command Imagex /capture C: C:\WinXP.wim "XP"
  • The above step will capture windows XP image from c: drive and save it with a file name Winxp.wim
  • the process will take around 10-15 minutes.
  • once done you may normally restart the pc.
  • next step is to copy winxp.wim from c: drive to Pen drive

 and that's it!!, we are done creating a bootable pen drive that can be used to install windows Vista, windows 7 or windows 8 and Windows XP as well.

You might be wondering how to install windows XP? So here are the steps...

Explanation: to install windows XP on a fresh HDD, we will create a new partition and then after format it with NTFS. next we will make that partition active and bootable. Once done, next step would be to apply windows XP image captured earlier to the newly created partition and finally, restart PC normally.


 Objective: Install windows XP from a bootable (windows) pen drive.


Follow the steps below to create a new partition to install windows XP. (if you already have a partition created on the Hard drive.)

  1. Boot from Pen drive created earlier
  2. on the setup screen press Shift+F10 to bring up Command prompt
  3. Type  Diskpart on command prompt
  4. Now type List disk, this will show all the Physical Hard disk drive and other drivers attached to pc. find the disk corresponding to you HDD (in my case it is was Disk 1)
  5. type select disk 1
  6. now type create partition primary size=102400 MB
  7. now type format fs=ntfs quick
  8. now type active
  9.  the step above automatically assigns drive letter to pen drive, but if it doesn't then you the next command.
  10. assign letter="C"
  11. now type exit
Step 2.Installtion
Now using the same command prompt got to the pen drive wherein we have our WinXP.wim and imagex.exe file.
now from the command prompt type the following commands.
imagex /apply WinXP.wim 1 C:\
C: is the drive letter on which we you wish to install OS.
now patiently wait for process to finish up. it would take around a minute or 2. you will be able to see the progress in the command prompt window.
Step 3.Adding boot information to Windows Partition.

using the command prompt, go to Pen drive and then Boot folder. In my case E: is the Pen drive letter and prompt looks like this.(instead of E: use your Pen drive letter)
E:\
E:\BOOT>
now type the following command
bootsect.exe /nt52 C:

Note: The above command will make the partition bootable with NTLDR.

Close all windows and restart pc normally, you will be greeted with windows XP logo....

Tips And while installing Win XP, if we change the priority of setup process through task manager (Shift+F10 then type taskmgr and press enter) to high then within 15 min Win-XP will install.

Tips for Installing Windows 8,7 from a Boot-able pen drive

Today, here is an article to create a bootable windows installation Pen drive. This will allow us to install newer versions of windows OS from this pen drive.

The steps given below are applicable for creating a Windows 7 and windows 8 Bootable USB disk.

Objective: Create a boot-able windows(vista , windows 7, windows 8) installation USB disk.


Requirements:

1. A USB 2.0 or 3.0 pen drive 4GB or higher
2. Original windows installation DVD media or iso image.
3. A system with Vista, windows 7 or windows 8 operating system with DVD drive.

In case you do not have any system having vista , 7 or windows 8 installed, still we can complete our task....
to do this, boot from windows vista, windows 7 or windows 8 disk, you can use any of the disks to prepare the pen drive.
after booting you will get the windows setup screen, now Press SHIFT+F10 key combination together and this will bring up command prompt on the screen, now you may follow the instructions below

Step 1.Preparation:
First we will prepare the pen drive, to do this open CMD (command prompt) with Administrative privileges and run the following commands.
note: this is clean all the data from pen drive, be sure to backup it first.
  • Type  Diskpart on command prompt
  • Now type List volume, this will show all the partitions and drivers attached to pc. find the drive letter corresponding to you pen drive(in my case it is was F:)
  • type select volume F
  • now type clean (this will clean pen drive completely, deleting all partitions)
  • now type create partition primary
  • now type format fs=ntfs quick
  • now type active
  •  the step above automatically assigns drive letter to pen drive, but if it doesn't then you the next command.
  • assign letter="f"
  • now type exit
Imp Note: Command prompt is still open and let it be, our pen drive is now ready.
 
Step 2. Adding boot information.

 using the command prompt, go to DVD drive and then Boot folder in windows installation DVD.
in my case E: is the DVD drive letter and prompt looks like this.(instead of E: use your DVD drive letter)
E:\
E:\BOOT>
now type the following command (f: is my pen drive letter)
bootsect.exe /nt60 f:
 
Step 3. Copy.
Next step is to insert windows installation DVD and copy all the contents from your windows installation DVD to the pen drive. copy windows vista DVD if you wish to install Vista, use windows 7 disk if you wish to install 7 or use windows 8 DVD if you wish to use pen drive to install windows 8.
Yes!! and we are done!!...You can now easily boot from this pen drive and use it to install windows on and pc that support booting from Pen drive. Suitable for net books, laptops etc.
try and see if it works for you..... you may use these steps for Windows Vista, Windows 7 and Windows 8 as well.

Most Uesful Backupz toolz

RED FLAG LINUX


  1. Download ISO file (Version 6.0 Desktop SP1)
Printer Not taking print command:
Click here to download the printflush.Zip file,extract the file and update Run Printflush.bat with administrative privileges.
now anytime print job is stuck double click the batch file and here you go.
I used the Disk Cleanup Tool in Windows Vista, and now the hybrid sleep feature and the hibernation feature are unavailable

http://go.microsoft.com/?linkid=9645383
Download and run the above file to resolve the issue.
Microsoft Downloads:

UPS Application Update


  1. USB Power Surge Error 
  2. Windows Vista asking for activation on a pre-installed Desktop
  3. Windows installer cleanup utility
  4. Windows Vista HOTFIX
  5. DirectX 9c for windows XP
  6. “Generic Host process Error” For Windows XP
  7. Windows Defender
  8. Microsoft Universal Audio Architecture drivers (UAA now same can be requested from Microsoft)
  9. Decoder Checkup utility
  10. Microsoft .Net framework 1.1
  11. Microsoft .Net framework 2.0
  12. Microsoft .Net framework 3.5
  13. Microsoft® Windows® Malicious Software Removal Tool (KB890830)
  14. Windows Installer 3.1 Redistributable (v2)
  15. Windows Installer 4.5 Redistributable
  16. Windows XP service pack 3 Standalone installer KB936929
  17. Windows Vista Service Pack 1 (Information and Download)
  18. Windows Vista Service Pack 2 (Requires Vista SP1 given above)
  19. Search for an error message on Support.Microsoft.com
  20. Windows messenger 5.1
  21. Windows 7 Download and Product Key
  22. Microsoft Office Trail Activation key
Windows update error Access denied 80070005
Solution:


  • Download the SubInACL tool and install it. By default it will install to c:\Program Files\Windows Resource Kits\Tools

  • If you are running Windows Vista, click on the Start menu, choose All Programs, then Accessories, then right-click on the item named Command Prompt and choose Run as administrator

  • If you are running an OS other than Windows Vista, go to the Start menu, choose Run, type cmd and click OK

  • Type notepad reset.cmd and click yes to create a new file named reset.cmd Download reset.cmd from this location on my file server and rename it from reset.cmd.txt to reset.cmd SONIC UPDATE:
    1. Sonic Burning engine update when Drive is not detected

    Software downloads:
    1. VLC Media Player 1.1.10 image
    2. WinRAR image
    3. Free Download Managerimage
    4. UnloCker
    5. Firefoximage
    6. Nero Lite Version 9.oimage
    7. Silverlight image
    8. Flash Player image

    ls


  • Light Scribe Service

  • Light Scribe Template labeler  
  • Hauppauge TV tuner:
    1. Driver CD
    2. MPEG Decoder for region not supported error
    3. Driver cleanup utility
    4. BB+Dongle driver

    Anti Virus Utilities:
    1. Enable registry, folder options
    2. Disable Write protection on USB (New) 
    3. Mal Ware removal for vista Update error
    4. Generic Host process error in windows
    5. Virus effect remover
    6. SuperAntiSpywarePro
    7. Trojan Remover Tool
    8. AVAST removal Tool
    9. McAfee Removal Tool
    10. K7 anti virus Removal Tool
    11. AVG remover 32
    12. AVG remover 64
    13. SymRegFix Tools For windows XP SP3 Registry error
    14. Norton removal Tool
    15. Kaspersky antivirus Removal Tool
    16. Norton removal Tool 2009 Products
    17. NO Disk Error in windows XP
    18. Microsoft® Windows® Malicious Software Removal Tool (KB890830)


  • Trick for MAGIC Folder For windows Vista and windows 7 clip_image002 clip_image004 Name that folder: GOOD.{ED7BA470-8E54-465E-825C-99712043E01C} clip_image006 Once you press enter the icon will change to clip_image008 Next step is to open the Folder and you will be surprised to find all the windows vista and windows 7 supported commands all at one place. clip_image002[4]  
    Tipz to get Correct Resolution on TFT
    Unable to use the native resolution of some displays Cause: Users may be unable to use the native resolution of some displays when using Intel® chipset graphics. Resolutions such as 1920x1080, 1680x1050 and 1440x900 are not available in graphics properties. This is caused when the display EDID is not read properly when connecting to a subset of Digital Flat Panel (DFP) displays there is a solution and article available from Intel ® as well.. http://www.intel.com/support/graphics/sb/cs-029955.htm Solution: Step1: Download Driver from the above Post for you motherboard Step2: Download and install WINRAR. Step3: Right Click and select Extract the setup file. Step4: Open the extracted folder and then –>Graphics—>Open File
    For windows Xp – igXP32.inf
    For Win7 and WinVista -IGDLH.inf
    Step5: Press CTRL + F and search DTD Step6: Now Replace: HKR,, TotalDTDCount, %REG_DWORD%, 0 ; This shows number of DTDs to be used. ; 0-->Disable the feature. With HKR,, TotalDTDCount, %REG_DWORD%, 1 ; This shows number of DTDs to be used. ; 0-->Disable the feature. and then the last line HKR,, DTD_5,%REG_BINARY%, 00, 00, 00 ,00, 00, 00,00, 00, 00,00, 00, 00,00, 00, 00,00, 00, 00,00, 00 ;Fifth DTD With Line as per you TFT model number W1707 W1907 HKR,, DTD_5, %REG_BINARY%, 9A,29,A0,D0,51,84,22,30,50,98,36,00,72,E6,10,00,00 1C ;1440×900@60p....Non-interlaced 2009f
    HKR,, DTD_5, %REG_BINARY%, 30,2A,40,C8,60,84,64,30,18,50,13,00,BB,FA,10,00,00,1E ;1600×900@60p....Non-interlaced
    2309m
    HKR,, DTD_5, %REG_BINARY%, 02,3A,80,18,71,38,2D,40,58,2C,45,00,FE,1F,11,00,00,1E ;1920×1080@60p....Non-interlaced

    W185q HKR,, DTD_5, %REG_BINARY%, 66 21 56 A8 51 00 1E 30 45 8F 3A 00 9A E6 10 00 00 1C ;1366x768@60p....Non-interlaced

    Step7: Save the file by pressing CTRL+S Step8: Open Device manager and Go to Display adapters then Right Click Intel® and select update Driver Step9: Browse to the folder where you have the above INF file saved and update the Driver, select continue anyway if asked. Step10: Restart and you may now select the resolution.
    HP Software:
    1. HP MY DISPLAY (Windows XP and windows Vista)
    2. Tablet PC scan For HP all in one printers
    3. Hp Total Care Advisor Download (New)
    4. Cyberlink You CAM (New)
    Help not working wireless USB LAN Driver
    Some more Support links

  • Acer

  • HCL Support Queries (great laptops)

  • IBM Lenovo Support

  • ASUS Driver Downloads