Showing posts with label PHP. Show all posts

Thursday 14 October 2021

udemy.com - PHP Object Oriented Programming Login Sys

 udemy.com - PHP Object Oriented Programming Build a Login System (by BrutalStorm)

PHP is a server-side scripting language, mainly used for web development but also used as a general-purpose programming language. Object-Oriented Programming (PHP OOP), is a type of programming language principle added to php5, that helps in building complex, reusable web applications.

Click to Download

Tuesday 10 November 2020

Error in Installing XAMPP On Windows-10 UAC Warning Message Solution fix


  •  I am trying to install xampp-windows-x64-7.1.29-1-VC14-installer. I get a message saying " Because an activated user account control ( UAC ) on your system some functions of XAMPP are possibly restricted with UAC please avoid to install XAMPP to c:\program Files (x86) ( missing write permisssions). Or deactivate UAC with msconfig after the setup.

    Installing XAMPP On Windows 10 & User Account Control (UAC) Warning Message

    How To work on UAC when Installing XAMPP 

    There are two things you need to check: 
    Ensure that your user account has administrator privilege.

    Disable UAC (User Account Control) as it restricts certain administrative function needed to run a web server.

    To ensure that your user account has administrator privilege, run lusrmgr.msc from the Windows Start > Run menu to bring up the Local Users and Groups Windows.
    Double-click on your user account that appears under Users, and verifies that it is a member of Administrators.

    To disable UAC (as an administrator), from Control Panel:According to the instruction they had given I simply went to

    • Start Menu –> Control Panel–> In the Control Panel search box just type User Account Control.
    • Then you will get the results among which I found; 

    Kumar Atul Jaiswal

    • “Change User Account Control Settings”

    Kumar Atul Jaiswal

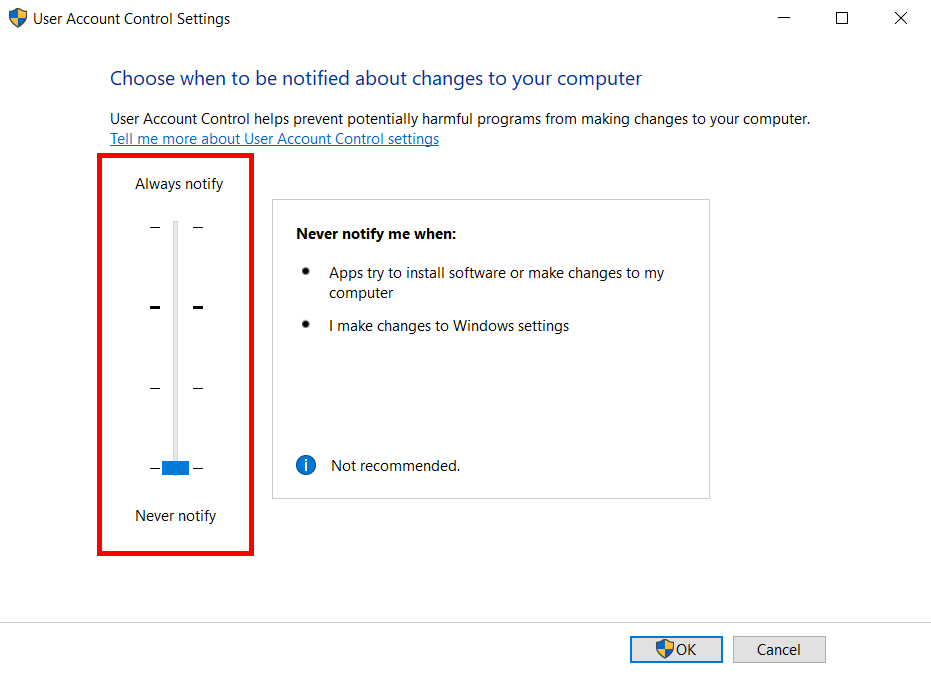
    In this User Account Control Settings Form you will find a slider that controls the level of notification messages you want when changes are done to your computer.

    Kumar Atul Jaiswal
    NOTE :- Alternately, if you don't want to disable UAC, you will have to install XAMPP in a different folder, outside of C:\Program Files (x86), such as C:\xampp.
  • Friday 29 May 2015

    PHP Variable Naming Conventions

    There are a few rules that you need to follow when choosing a name for your PHP variables.
    • PHP variables must start with a letter or underscore "_".
    • PHP variables may only be comprised of alpha-numeric characters and underscores. a-z, A-Z, 0-9, or _ .
    • Variables with more than one word should be separated with underscores. $my_variable
    • Variables with more than one word can also be distinguished with capitalization. $myVariable

    Strings in PHP


    In the last lesson, PHP Echo, we used strings a bit, but didn't talk about them in depth. Throughout your PHP career you will be using strings a great deal, so it is important to have a basic understanding of PHP strings.
    PHP - String Creation
    Before you can use a string you have to create it! A string can be used directly in a function or it can be stored in a variable. Below we create the exact same string twice: first storing it into a variable and in the second case we place the string directly into a function.
    PHP Code:
    $my_string = "Tizag - Unlock your potential!";
    echo "Tizag - Unlock your potential!";
    echo $my_string;
    In the above example the first string will be stored into the variable $my_string, while the second string will be used in the echo function and not be stored. Remember to save your strings into variables if you plan on using them more than once! Below is the output from our example code. They look identical just as we thought.
    Display:
    Tizag - Unlock your potential! Tizag - Unlock your potential!
    PHP - String Creation Single Quotes
    Thus far we have created strings using double-quotes, but it is just as correct to create a string using single-quotes, otherwise known as apostrophes.
    PHP Code:
    $my_string = 'Tizag - Unlock your potential!';
    echo 'Tizag - Unlock your potential!';
    echo $my_string;
    If you want to use a single-quote within the string you have to escape the single-quote with a backslash \ . Like this: \' !
    PHP Code:
    echo 'Tizag - It\'s Neat!';
    PHP - String Creation Double-Quotes
    We have used double-quotes and will continue to use them as the primary method for forming strings. Double-quotes allow for many special escaped characters to be used that you cannot do with a single-quote string. Once again, a backslash is used to escape a character.
    PHP Code:
    $newline = "A newline is \n";
    $return = "A carriage return is \r";
    $tab = "A tab is \t";
    $dollar = "A dollar sign is \$";
    $doublequote = "A double-quote is \"";
    Note: If you try to escape a character that doesn't need to be, such as an apostrophe, then the backslash will show up when you output the string.
    These escaped characters are not very useful for outputting to a web page because HTML ignore extra white space. A tab, newline, and carriage return are all examples of extra (ignorable) white space. However, when writing to a file that may be read by human eyes these escaped characters are a valuable tool!
    PHP - String Creation 
    The two methods above are the traditional way to create strings in most programming languages. PHP introduces a more robust string creation tool called heredoc that lets the programmer create multi-line strings without using quotations. However, creating a string using heredoc is more difficult and can lead to problems if you do not properly code your string! Here's how to do it:
    PHP Code:
    $my_string = <<<TEST
    Tizag.com
    Webmaster Tutorials
    Unlock your potential!
    TEST;
    echo $my_string;
    There are a few very important things to remember when using heredoc.
    • Use <<< and some identifier that you choose to begin the heredoc. In this example we chose TEST as our identifier.
    • Repeat the identifier followed by a semicolon to end the heredoc string creation. In this example that was TEST;
    • The closing sequence TEST; must occur on a line by itself and cannot be indented!
    Another thing to note is that when you output this multi-line string to a web page, it will not span multiple lines because we did not have any <br /> tags contained inside our string! Here is the output made from the code above.
    Display:
    Tizag.com Webmaster Tutorials Unlock your potential!
    Once again, take great care in following the heredoc creation guidelines to avoid any headaches.

    PHP - Operators


    In all programming languages, operators are used to manipulate or perform operations on variables and values. You have already seen the string concatenation operator "." in the Echo Lesson and the assignment operator "=" in pretty much every PHP example so far.
    There are many operators used in PHP, so we have separated them into the following categories to make it easier to learn them all.
    • Assignment Operators
    • Arithmetic Operators
    • Comparison Operators
    • String Operators
    • Combination Arithmetic & Assignment Operators

    Sunday 26 February 2012

    Mail

    You should be able to form the email by using this syntax (you can add other fields, like cc, as well):

    mailto:emailaddress?subject=my%20subject&amp;body=my%20body

    For example:

    Code:
    <form method="GET" action="mailto:email-address">
    <input type="hidden" name="subject" value="test">
    <input type="hidden" name="body" value="test">
    <input type="submit" value="Send Email">
    </form>
    or as a link:

    Code:
    <a href="mailto:emailaddress?subject=test&amp;body=test">email</a>
    You can always disguise the link as a button

    Make contact form and send email in PHP


    Make contact form and send email in PHP

    Having a contact form on your web site is vital when you need to know what your site visitors think about your web site. We will first create a simple contact form with 3 fields - Email address, Name, Comments. I will use a table to align the 3 fields and the Send button. Create a new file and paste the code below in it. Save it as test.php and upload it to your web server. Now, you have a web page (http://www.yourdomain.com/test.php) with a simple contact form on it.
    <form action="test.php" method="post"> 
    <table width="400" border="0" cellspacing="2" cellpadding="0"> 
    <tr> 
    <td width="29%" class="bodytext">Your name:</td> 
    <td width="71%"><input name="name" type="text" id="name" size="32"></td> 
    </tr> 
    <tr> 
    <td class="bodytext">Email address:</td> 
    <td><input name="email" type="text" id="email" size="32"></td> 
    </tr> 
    <tr> 
    <td class="bodytext">Comment:</td> 
    <td><textarea name="comment" cols="45" rows="6" id="comment" class="bodytext"></textarea></td> 
    </tr> 
    <tr> 
    <td class="bodytext">&nbsp;</td> 
    <td align="left" valign="top"><input type="submit" name="Submit" value="Send"></td> 
    </tr> 
    </table> 
    </form>
    Then we will need the actual PHP code which will send the email when the above form is submitted. We will need to define the email that the message should be sent to ($ToEmail) and also the subject for the message that will be sent ($EmailSubject). Change youremail@site.com to your email address where the message should be sent and also add an appropriate subject for you message. The $mailheader variable is used to define the email message header. We set the From, Reply-To and Content-type fields for the message. There are some more fields that can be used but for this example we will only use these 3. Depending on your server configuration you may need to have the From and Reply-to fields be a valid email address from your server.If you have a domain name mysite.com, then you should use a valid email address such as contact@mysite.com. In this example I am sending the email using the actual email address that is submitted via the form on site. Next all the data submitted via the web form is taken from the $_POST variable and saved in the $MESSAGE_BODY variable. Using the nl2br function you will make all the new lines in your comments box appear as new lines in your email message too. Having all the needed data for our email message we will use the mail() function which will send that email for us.
    <?php 
    $ToEmail = 'youremail@site.com'; 
    $EmailSubject = 'Site contact form '; 
    $mailheader = "From: ".$_POST["email"]."\r\n"; 
    $mailheader .= "Reply-To: ".$_POST["email"]."\r\n"; 
    $mailheader .= "Content-type: text/html; charset=iso-8859-1\r\n"; 
    $MESSAGE_BODY = "Name: ".$_POST["name"]."<br>"; 
    $MESSAGE_BODY .= "Email: ".$_POST["email"]."<br>"; 
    $MESSAGE_BODY .= "Comment: ".nl2br($_POST["comment"])."<br>"; 
    mail($ToEmail, $EmailSubject, $MESSAGE_BODY, $mailheader) or die ("Failure"); 
    ?>
    All we have to do now is to combine the web form and email sending code into a single page. We will use an IF statement to check if the form has been submitted and if so it will send that email and will show a "Your message was sent" message on the screen instead of the web form.
    <?php 
    if ($_POST["email"]<>'') { 
     $ToEmail = 'youremail@site.com'; 
     $EmailSubject = 'Site contact form '; 
     $mailheader = "From: ".$_POST["email"]."\r\n"; 
     $mailheader .= "Reply-To: ".$_POST["email"]."\r\n"; 
     $mailheader .= "Content-type: text/html; charset=iso-8859-1\r\n"; 
     $MESSAGE_BODY = "Name: ".$_POST["name"]."<br>"; 
     $MESSAGE_BODY .= "Email: ".$_POST["email"]."<br>"; 
     $MESSAGE_BODY .= "Comment: ".nl2br($_POST["comment"])."<br>"; 
     mail($ToEmail, $EmailSubject, $MESSAGE_BODY, $mailheader) or die ("Failure"); 
    ?> 
    Your message was sent
    <?php 
    } else { 
    ?> 
    <form action="test.php" method="post">
    <table width="400" border="0" cellspacing="2" cellpadding="0">
    <tr>
    <td width="29%" class="bodytext">Your name:</td>
    <td width="71%"><input name="name" type="text" id="name" size="32"></td>
    </tr>
    <tr>
    <td class="bodytext">Email address:</td>
    <td><input name="email" type="text" id="email" size="32"></td>
    </tr>
    <tr>
    <td class="bodytext">Comment:</td>
    <td><textarea name="comment" cols="45" rows="6" id="comment" class="bodytext"></textarea></td>
    </tr>
    <tr>
    <td class="bodytext">&nbsp;</td>
    <td align="left" valign="top"><input type="submit" name="Submit" value="Send"></td>
    </tr>
    </table>
    </form> 
    <?php 
    }; 
    ?>

    PHP form to email explained


    PHP form to email explained

    It is a common requirement to have a form on almost any web site.
    In this article, we will create a PHP script that will send an email when a web form is submitted.
    There are two parts for the web form:
    1. The HTML form code for the form. The HTML code below displays a standard form in the web browser. If you are new to HTML coding, please see: HTML form tutorial
    2. The PHP script for handling the form submission. The script receives the form submission and sends an email.

    HTML code for the email form:
    <form method="post" name="myemailform" action="form-to-email.php">
    Enter Name: <input type="text" name="name">
    Enter Email Address:    <input type="text" name="email">
    Enter Message:  <textarea name="message"></textarea>
    <input type="submit" value="Send Form">
    </form>
    The form contains the following fields:
    name, email and message.
    name and email are single-line text input fields where as message is a text area field (multi-line text input).
    You can have different types of input fields in a form. Please see the HTML form input examples page for details.
    On hitting the submit button, the form will be submitted to "form-to-email.php". This form is submitted through the POST method

    Accessing the form submission data in the PHP script

    Once your website visitor has submitted the form, the browser sends the form submission data to the script mentioned in the 'action' attribute of the form. (for the current form, the script is form-to-email.php)
    Since we have the form submission method mentioned as POST in the form (method='post') we can access the form submission data through the $_POST[] array in the PHP script.
    The following code gets the values submitted for the fields: name, email and message.
    <?php
      $name $_POST['name'];
      $visitor_email $_POST['email'];
      $message $_POST['message'];
    ?>

    Composing the email message

    Now, we can use the above PHP variables to compose an email message. Here is the code:
    <?php
        $email_from 'yourname@yourwebsite.com';
        $email_subject "New Form submission";
        $email_body "You have received a new message from the user $name.\n".
                                "Here is the message:\n $message".
    ?>
    The 'From' address, the subject and the body of the email message are composed in the code above. Note the way the body of the message is composed using the variables.
    If a visitor 'Anthony' submits the form, the email message will look like this:

    "You have received a new message from the user Anthony.
    Here is the message:
    Hi,
    Thanks for your great site. I love your site. Thanks and Bye.
    Anthony."

    Sending the email

    The PHP function to send email is mail().
    mail(to,subject,message,headers)
    For more details, see the PHP mail() page.
    The headers parameter is to provide additional mail parameters ( like the from address, CC, BCC etc)
    Here is the code to send the email:
    <?php
      $to "yourname@yourwebsite.com";
      $headers "From: $email_from \r\n";
      $headers .= "Reply-To: $visitor_email \r\n";
      mail($to,$email_subject,$email_body,$headers);
     ?>
    Notice that we put your email address in the 'From' parameter and the visitor's email address in the 'Reply-To' parameter. The 'From' parameter should indicate the origin of the email. If you put the visitor's email address in the 'From' parameter, some email servers might reject the email thinking that you are impersonating someone.

    Sending the email to more than one recipients

    If you want to send the email to more than one recipients, then you just need to add these in the "$to" variable.
    <?php
      $to "name1@website-name.com, name2@website-name.com,name3@website-name.com";
      mail($to,$email_subject,$email_body,$headers);
    ?>
    You can use the CC (carbon copy) and BCC (Blind Carbon Copy) parameters as well. The CC and BCC emails are added in the 'headers' parameter.
    Sample code:
    <?php
    $to "name1@website-name.com, name2@website-name.com,name3@website-name.com";
    $headers "From: $email_from \r\n";
    $headers .= "Reply-To: $visitor_email \r\n";
    $headers .= "Cc: someone@domain.com \r\n";
    $headers .= "Bcc: someoneelse@domain.com \r\n";
    mail($to,$email_subject,$email_body,$headers);
    ?>

    Securing the form against email injection

    Spammers are looking for exploitable email forms to send spam emails. They use the form handler script as a 'relay'. What they do is to submit the form with manipulated form values. To secure our form from such attacks, we need to validate the submitted form data.
    All the values that go in the 'headers' parameter should be checked to see whether it contains \r or \n. The hackers insert these characters and add their own code to fool the function.
    Here is the updated code:
    <?php
    function IsInjected($str)
    {
        $injections array('(\n+)',
               '(\r+)',
               '(\t+)',
               '(%0A+)',
               '(%0D+)',
               '(%08+)',
               '(%09+)'
               );
        $inject = join('|'$injections);
        $inject "/$inject/i";
        if(preg_match($inject,$str))
        {
          return true;
        }
        else
        {
          return false;
        }
    }
    if(IsInjected($visitor_email))
    {
        echo "Bad email value!";
        exit;
    }
    ?>
    In general, any value used in the header should be validated using the code above.
    Better, complete validations could be done using the PHP form validation script here.

    PHP form to email complete code

    The link below contains the complete form, validation and emailing code.