Sunday 7 July 2013

What is Cloud Computing ?

Cloud Computing

What is Cloud Computing ?
Cloud computing is location-independent computing, whereby shared servers provide resources, software, and data tocomputers and other devices on demand, as with the electricity grid.
source : http://en.wikipedia.org/wiki/Cloud_computing

Cloud Computing as the term indicates implies using the cloud infrastructure or internet based shared infrastructure to host and access applications. That means hosting application and their data on a shared servers on the internet and access the applications through a browser.

Things that cloud computing change

  • Completely shift from Desktop based model to Web based model. In cloud computing model applications are web based hosted on a cloud server and users can access the applications through a web browser. 
  • Hosting application and services. Today most business organizations host application on their servers and use their firewalls. So adding these things is a extra overhead for organizations. Moving to the cloud model make it easier to organizations.
  • Security, a key implication in cloud computing is that security risk added by the third party provider.  
Saas, Paas and Iaas

Cloud computer has various flavors of implementation. In here we talk about SaaS(Software as a Service) , PaaS(Platform as a service), IaaS(Infrastructure as a service).

Software as a Service (Saas)

This term describe software that is deployed over the internet. The services are provided with typically payment charged on monthly basis based on the number of users or services consumed. 

Platform as a service (PaaS)  

Provide the ability for building and deploying custom application on their platform. 
Amazon EC2 , Microsoft Azure , Google App Engine are some of service providers.

Infrastructure as a service (Iaas)

Provide computer and server infrastructure as a virtualization environment. 
Amazon Web Services and Rackspace are examples of service provides.

Here is the brief description about cloud computing. 

In Linux Google App Engine in Eclipse

 In Linux Google App Engine in Eclipse

In this article I'm going to show you how to develop and deploy a small Java app engine application on Google App Engine using Eclipse IDE.

STEP 1
First you have to install Eclipse IDE for that . Its free so anyone can download. Here is the link.
Eclipse IDE

STEP 2
Now install Java SDK. Here is the link..
Java SDK

STEP 3
Now install the Google Eclipse App Engine plugin.
Ref Link : http://code.google.com/eclipse/docs/install-from-zip.html

STEP 4
Install the Google web toolkit plugin.
Ref Link : http://code.google.com/webtoolkit/gettingstarted.html

  • There is easiest way to follow Step 3 and 4. Click Help --> Eclipse Market Place 
  • Type Google App Engine
  • install the plugin

STEP 5
Create Web Application.

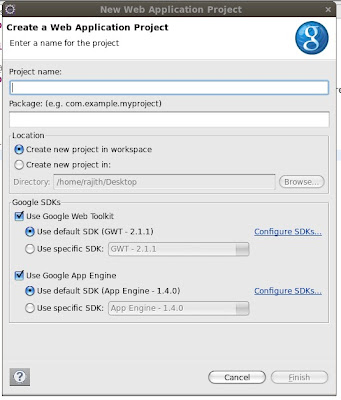
File --> New --> Web application or Simply click the g icon (blue background).
 
  • Enter the Project Name  as GuestBook and Package name as guestbook.
  • Make sure Google Web Toolkit checkbox and Google App Engine check box is selected.
  • Click Finish.

STEP 6
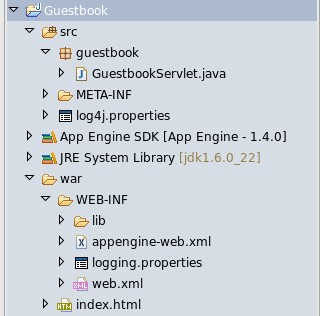
Now it will create the project structure like this.
 
There are some files that Eclipse automatically created.
  • src/GuestBookServlet.java
  • war/WEB-INF/web.xml
  • war/WEB-INF/appengine-web.xml 
STEP 7
After that debug your app like this. Click Run ---> Debug as ---> Web Application 
now it will create a server 8888 port so you can access it by browsing http://localhost:8888/

STEP 8
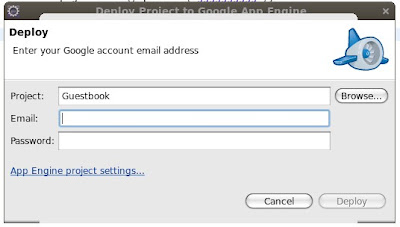
To deploy your app to Google App Engine right click the app select Google --> Deploy to App Engine
 

Before deploy get application ID from http://code.google.com/appengine/ .

So, These are the major steps that you want to follow to create and deploy Java App Engine application to Google App Engine.
 

mysql databases.

Restore & Backup Mysql Database using mysqldump Command

mysqldump is a effective tool to backup and restore mysql databases. Using mysqldump command we can backup one or many databases or tables.

You have to use command prompt[Windows users] or kernel[Linux users,MacOS] to backup databases.

Backup Mysql Database

  • Backup a single database
mysqldump -u root -p[root_mysql_password] [database_name] > [path_to_save_with_sql_extension]

ex:
mysqldump -u root -p123 test > D:/backups/test_backup.sql

  • Backup Multiple databases
mysqldump -u root -p[root_mysql_password] --databases [database_name] [database_name] .. > [path_to_save_with_sql_extension]

ex:
suppose we have two databases called test and tutorial
mysqldump -u root -p123 --databases test tutorial > D:/backups/test_tutorial.sql

  • Backup all the databases
mysqldump -u root -p[root_mysql_password] -all-databases > [path_to_save_with_sql_extension]
  • Backup a specific table 
Suppose we have a demo table in test database.

mysqldump -u root -p123 test demo \ > D:/backups/demotables.sql

Restore Mysql Database

To restore mysql database use following command.

mysql -u root -p[root_mysql_password] [database_name] < D:/backups/test.sql

Java 7 / Apache Click/ Apache Shiro

New in Java 7 ?

Everyone is now searching what's hot in java 7(including me :D). What are the new features that added to java 7. When I'm searching I found a good slide presentation that visualize what are the new things that added to java 7 . It was an amazing :D . Check this presentation and you can see why most of people in love with java.
http://blog.eisele.net/2011/07/introducing-java-7-moving-forward-7711.html

Application Protection with Apache Shiro


Apache Shiro is a Java security framework that performs four kind of operations such as authentication, authorization, cryptography and session management. Can use in any kind of web applications or mobile applications. It provide a security API for perform the above tasks.

Advantages of Apache Shiro

  • Easy to use
              Using and Implementing is very easy.
  • Comprehensive
            There is no other security framework can compare to Apache shiro. It provide wide range of security aspects.
  • Flexible
           Can work in any application like Web or EJB.
  • Pluggable
           Can integrate with many other framework like Apache camel, Spring , Vaadin , Grails.
      

Shiro was 5 years old and previously know as Jsecurity project. There were no other alternatives for java security but the Java Authentication and Authorization Service (JAAS). But in JAAS also have some issues with cryptographic. Java cryptographic architecture was hard to understand and it did not use as usual. But in Apache Shiro it gives flexible security for Java developers add security there applications.

Furtherer References : Apache Shiro Home Page  

Apache Click


 Apache Click is a Web application framework for Java language and built top of Java Servlet API. Its free and open source project under Apache foundation.

In the new version of Apache Click (version 2.3.0) it add some new features like AJAX support, Page Actions and stateful controls.  Using Apache click we can build a web applications without using JSPs and MCV architecture.

Apache click use HTML templates an POJO for develop applications. It also include some unit testing features.

Ref : Apache Click Home
       : Getting Started with apache click
       : Examples

Deploy Java Web Application in Amazon Ec2 using Eclipse

Guidance on How to Deploy Java Web Application in Amazon Ec2 using Eclipse also web server Apache Tomcat

Hi friends
Today I'm going to show you how to deploy simple java web application in amazon ec2 using Eclipse IDE.
Before we begin we need some required things,


Step 1
  • First you have to install the AWS toolkit for eclipse plugin. Simply go to Help--> Eclipse Market Place --> Search Amazon
  • You will get the AWS toolkit for eclipse .
  • Click Install
  • It will show the corresponding packages and after agree the license will install it. Just a simple procedure.

Step 2
  • Windows --> Preferences --> select AWS Toolkit and Fill the fields according to your amazon ec2 account 
  • Give your name to Account Name (Not Necessary), but give exact value to Access Key ID and Secret Access Key according to your amazon acc.
  • In the optional configuration (Expand it) give account id (exact value) to that field.

Step 3
  • Windows --> Show view --> Other --> Select AWS toolkit view (Select all views) --> OK
  • Now you can see the perspective view of aws.

Step 4
  • Now the configuration part is over.
  • Lets create a Amazon ec2 server. To do that File --> New --> Other --> Server --> server  --> select amazon ec2 or amazon elastic server tomcat version 6 (you can either choose tomcat version 7)
  • Fill the fields and Finish. (Hope you have some basic understand about eclipse)


Step 5
  • Now create a Dynamic Web project. File --> New --> Other -> Web --> Dynamic Web Project
  • Give whatever name you like.
  • Choose AWS Ec2 or Elastic runtime as a target runtime. 
  • Click Finish


Step 6
  • Now create a servlet and Finish
  • Change the doGet() in servlet (Only for demo. This is where your code


Step 7
  • Right click Servlet --> Run as --> Run On server --> Select the server you above create and Finish.
 

Step 8
  • Eclipse will automatically open the web page that you created. (Or in server tab right click the server and select amazon web service --> running)

tool that lets your create location-based applications

Here’s a tool that lets your create location-based applications such as Distance Search, Map Mashups, and Automatic Geocoding without coding http://blog.caspio.com/web_apps/create-location-based-applications-with-caspio/

Friday 5 July 2013

Your first J2ME program and a midlet lifecycle explained.

As a programmer, you probably know that the first program you ever write when you are learning a new language is displaying the famous words, 'Hello World". This was the first program that the founders of the great C language introduced when they introduced the C language to the world. Here is the MIDP version of the inveterate "Hello World" program. The following J2ME code sample shows the source code for the first version of the HelloWorld MIDlet.
//This is the MIDP version of the familiar HelloWorld program.
import javax.microedition.lcdui.Display;
import javax.microedition.lcdui.Displayable;
import javax.microedition.lcdui.Form;
import javax.microedition.midlet.MIDlet;
/**
Creates the "Hello world" program in J2ME MIDP.
Note that the class must be public so that the device
application management software can instantiate it.
*/
public class HelloWorld extends MIDlet


{
// The Displayable. This component is displayed on the
// screen.
private Form form;
// The Display. This object manages all Displayable
// components.
private Display display;
// A public no-arg constructor is necessary, even though
// the system calls startApp()! The AMS calls the
// class's no-arg constructor to instantiate the class.
// Either create a public no-arg constructor, or declare
// no constructors, and let the compiler create a public
// no-arg constructor.
//
public HelloWorld()
{
super();
}
public void destroyApp(boolean destroy)
{
form = null;
notifyDestroyed();
}
public void pauseApp()
{
}
public void startApp()
{
// Create a Displayable widget.
form = new Form("Hello, World");
// Add a string to the form.
String msg = "My first MIDlet!";
form.append(msg);
// This app simply displays the single form created
// above.
display = Display.getDisplay(this);
display.setCurrent(form);
}
}
First, notice that this application defines a class called HelloWorld, which extends javax.microedition.midlet.MIDlet. All MIDlets must extend this class. The HelloWorld class is the primary class of your application. For this reason, it must be declared public. Moreover, you must declare a public no-argument constructor, or ensure that there are no constructors, in which case the compiler will define a no-argument constructor for you. Readers who are familiar with Java applets will recognize the similarity between the applet and MIDlet lifecycle control models.
 

In the program above, the startApp(), pauseApp(), and destroyApp() methods override abstract declarations from the MIDlet class. Notice that all the initialization code goes in the startApp() method rather than in the constructor. You certainly can put some initialization code in your constructor; it will be executed before the call to startApp(). However, the startApp() method is always called as the entry point for your MIDlet.

What about a main() method? The Java language definition requires all Java applications to have a main() method with the following signature:
public static void main(String [] args)
If J2ME applications are real Java applications, then there must be a main method somewhere that is the real entry point used by the VM to start the process of executing the application. In fact, there is such a method. It's part of the MIDP implementation (not the application), and, typically, the AMS software calls it. The AMS handles application invocation requests, for instance, by spawning a thread for each MIDlet startup request and controlling the MIDlet from that thread. Actual details are implementation dependent. In Sun's J2ME Wireless Toolkit, the class com.sun.midp.Main defines the main() method.
The startApp() method creates an object called a form and passes a string to the constructor that represents the form's title. A form is an instance of the class javax.microedition.lcdui.Form, which is a kind of screen that you can see on your display. It's so named because it functions somewhat like an HTML form—it contains one or more visual items, such as strings.
Next, the startApp() method creates a regular String object and adds it to the form. It then gets a reference to an object called a display, and it sets the form object as the currently displayed entity of the display.
After all this code executes, you see the screen. When you click or press the handset
button that tells the device to hang up, the AMS invokes destroyApp(), which simply eliminates all references to the form object previously created. It's now subject to garbage collection. The AMS then terminates the MIDlet.

You're responsible for properly disposing of objects created by your MIDlets. In this contrived case, it shouldn't matter whether or not you set the reference to the form variable to null, because the MIDlet terminates. But in general, you need to properly manage the references to your program's objects, just as you would in any Java program.

Java ME SDK 3.0.5 Integrated with NetBeans 7.1.1

Java ME SDK 3.0.5 Integrated with NetBeans 7.1.1


NetBeans 7.1.1 now integrates Java ME SDK 3.0.5, so you do not have to download them separately. Java ME SDK was packaged in NetBeans Mobility Pack, a mobile application development toolkit for NetBeans. Therefore, Java ME SDK is no longer a separate menu on NetBeans.
For those who have not downloaded Java ME SDK yet, please simply visit NetBeans website and download the latest version. For those who already have Java ME SDK integrated with NetBeans 7.1 or earlier, and want to update NetBeans IDE to 7.1.1, don't worry. They can co-exist.
To use NetBeans plug-ins such as Device Selector, profiler, and Internationalization Resource Manager, you have to install "Java ME SDK Tools" from NetBeans. Here is how.
1.  Go to "Tools - Plug-ins" from NetBeans menu. You can find all the plug-ins you can install into NetBeans. Locate "Java ME SDK Tools" from the list.

2. Follow the instruction to install Java ME SDK Plug-ins.

3. Once completed, you will see new menu options. For example, you can find Device Selector under Tools - Java ME. (If you used old version of Java ME, you will notice that there is not 'Java ME' menu any more. This is because all the sub-menus were integrated into appropriate places in NetBeans.)

There is one thing to keep in mind; Since NetBeans 7.1.1 already includes Java ME SDK 3.0.5 and Java ME SDK 3.0.5 plug-ins must be installed through NetBeans plug-in menu, you should not download Java ME SDK 3.0.5 separately and try to integrate it with NetBeans. This may cause issues.

Note :

Note : 

Web Site / Domain name will be changed to this site 

gist.blogspot.com effectively from 23-07-2013