Showing posts with label Forensics. Show all posts

Saturday 18 April 2020

Knoppix

(Knoppix)

{ Getting Started }

Section 0. Background Information
  • Knoppix is a GNU/Linux distribution that boots and runs completely from CD or DVD and can be used to read and write Windows and other partitions (among other clever tricks)
  • The Knoppix CD and DVD include recent Linux software and desktop environments.
  • The DVD includes programs such as OpenOffice.org, Abiword, The Gimp, Konqueror, Mozilla, Apache, PHP, MySQL and hundreds of other quality open source programs.
Section 1. Downloading Knoppix
  1. Go To http://archive.cs.stedwards.edu/knoppix/
  2. Select a file that ends with ".iso"
    • Note: EN stands for English
  3. Saving the ISO
    • Command:  Click Save
  4. Saving ISO to a location
    • Instruction: It's up to you were you want to save the file.  In my case, I will save the ISO to H:\BOOT ISO

Section 2. Configure the Windows Virtual Machine to boot up knoppix
  1. Edit the WindowsVulnerable01 virtual machine. (See Below)
    • Note: For those of you that don't have access to class material, this can be Windows XP, 2000, 2003 and 7.
  2. Configure Windows to boot off Knoppix
    • Instructions
      1. Select CD/DVD (IDE)
      2. Select the Use ISO image file
      3. Browse to where you saved the knoppix iso.
      • Note:  In my case, I save it in the following location:
      • H:\BOOT ISO\KNOPPIX_V6.4.4CD-2011-01-30-EN.iso
  3. Configure Knoppix to use Linux VMware setting.
    • Instructions
      1. Select the Options tab
      2. Select Linux for the Guest operating system
      3. Select Ubuntu for the Guest operating system version.
      4. Select OK.
  4. Play the Virtual Machine
    • Select Play Virtual Machine


Section 3. Start Up Knoppix
  1. Knoppix Start
    • Instructions
      1. Let knoppix boot it, it will takes 30 seconds to 1 minute.
      2. Click on the KNOPPIX Folder
  2. Mounting your hard drive
    • Instructions:
      1. Click on sda1 (This is your hard drive)
      2. Click on Documents and Settings
  3. Navigate to Favorites
    • Instructions:
      1. Click on Administrator
      2. Click on Favorite

Section 4. Start Up Terminal Window
  1. Start up a Terminal Windows
    • Command:  Click on the Black Terminal Window (See Below)
  2. View the file system structure using Knoppix
    • Command:  df -k (See Below)
    • Note:
      • /dev/sda1 is your hard drive
      • /media/sda1 is the mount point of your hard drive.
  3. Navigate to your hard drive
    • Command:  cd /media/sda (See Below)
    • Command:  ls
  4. Navigate to Favorites
    • Instructions:
      1. cd Documents\ and\ Settings
        • Press the TAB key after typing "D"
      2. cd Administrator
        • Press the TAB key after typing "A"
      3. cd Favorites
        • Press the TAB key after typing "A"
      4. ls -l
      5. date
    • Proof of Lab: Do a screen print, cut in paste into a word document, and upload to Moodle.
Section: Proof of Lab5
  1. Cut and Paste a screen shot found in Section 4, Step 4 in a word and upload to Moodle. 


Data Hiding

(Data Hiding: Lesson 1)

{ Hiding Data in Slack Space using bmap }

Section 0. Background Information
  1. What is the scenario?
    • Have you ever heard of Cyber Espionage where a spy was able to hide data and go virtually un-noticed?  The following lesson demonstrates how easy it is for a person to hide data in a file's slack space.
  2. bmap 
    • Bmap is a data hiding tool that can utilize slack space in blocks to hide data.
    • It can perform lots of functions interesting to the computer forensics community and the computer security community.
  3. Slack Space
    • Blocks are specific sized containers used by file system to store data. Blocks can also be defined as the smallest pieces of data that a file system can use to store information. Files can consist of a single or multiple blocks/clusters in order to fulfill the size requirements of the file. When data is stored in these blocks two mutually exclusive conditions can occur; The block is completely full, or the block is partially full. If the block is completely full then the most optimal situation for the file system has occurred. If the block is only partially full then the area between the end of the file the end of the container is referred to as slack space.
  4. Lab Notes
    • In this lab we will do the following:
      1. Download bmap
      2. Compile bmap
      3. Hide a secret message into a file that contains slack space
  5. Legal Disclaimer
    • As a condition of your use of this Web site, you warrant to computersecuritystudent.com that you will not use this Web site for any purpose that is unlawful or that is prohibited by these terms, conditions, and notices.
    • In accordance with UCC § 2-316, this product is provided with "no warranties, either express or implied." The information contained is provided "as-is", with "no guarantee of merchantability."
    • In addition, this is a teaching website that does not condone malicious behavior of any kind.
    • You are on notice, that continuing and/or using this lab outside your "own" test environment is considered malicious and is against the law.
    • © 2013 No content replication of any kind is allowed without express written permission.

Section 1: Start Up the BackTrack5R1 VM
  1. Start Up VMWare Player
    • Instructions:
      1. Click the Start Button
      2. Type Vmplayer in the search box
      3. Click on Vmplayer
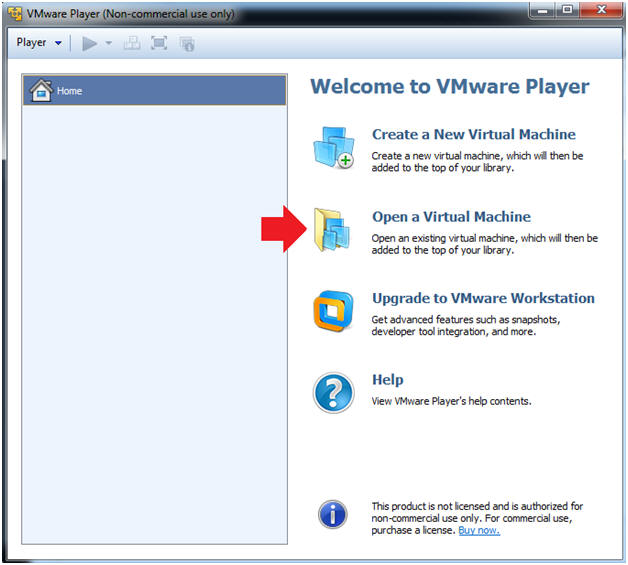
  2. Open a Virtual Machine
    • Instructions:
      1. Click on Open a Virtual Machine
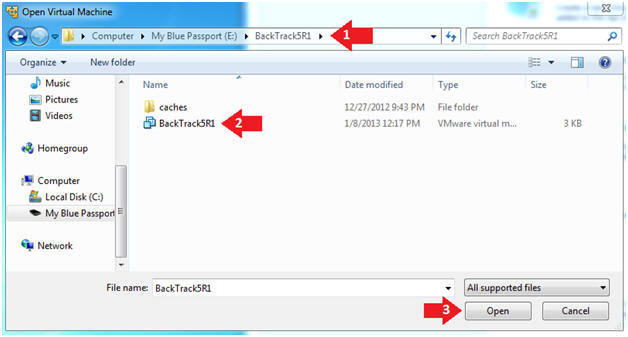
  3. Open the BackTrack5R1 VM
    • Instructions:
      1. Navigate to where the BackTrack5R1 VM is located
      2. Click on on the BackTrack5R1 VM
      3. Click on the Open Button
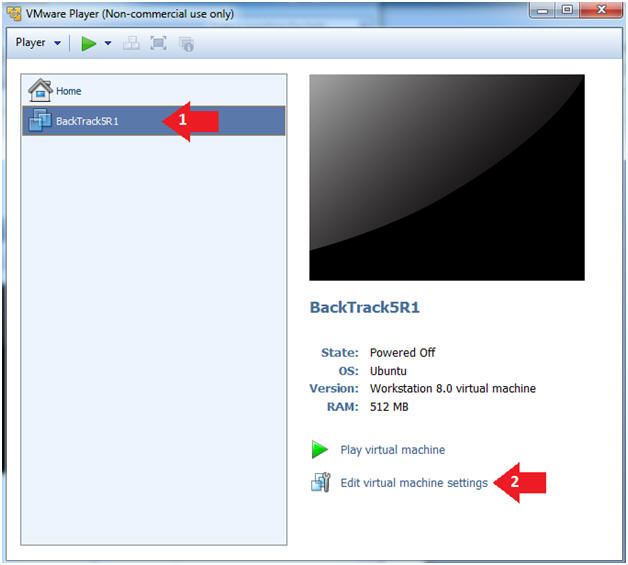
  4. Edit the BackTrack5R1 VM
    • Instructions:
      1. Select BackTrack5R1 VM
      2. Click Edit virtual machine settings
  5. Edit Virtual Machine Settings
    • Instructions:
      1. Click on Network Adapter
      2. Click on the Bridged Radio button
      3. Click on the OK Button
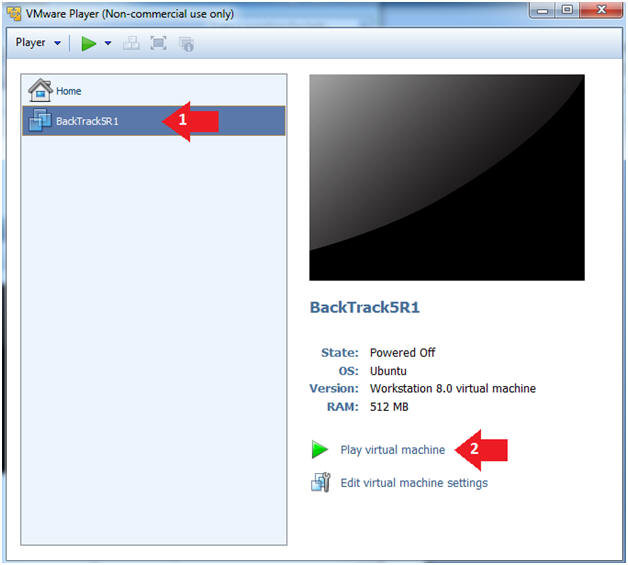
  6. Play the BackTrack5R1 VM
    • Instructions:
      1. Click on the BackTrack5R1 VM
      2. Click on Play virtual machine
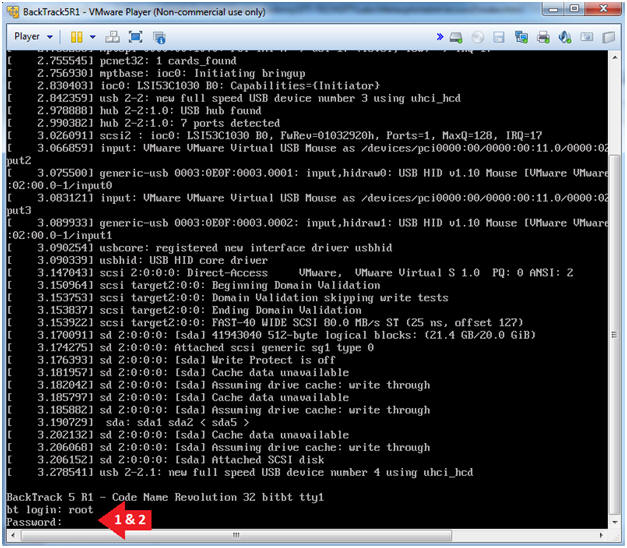
  7. Login to BackTrack
    • Instructions:
      1. Login: root
      2. Password: toor or <whatever you changed it to>.
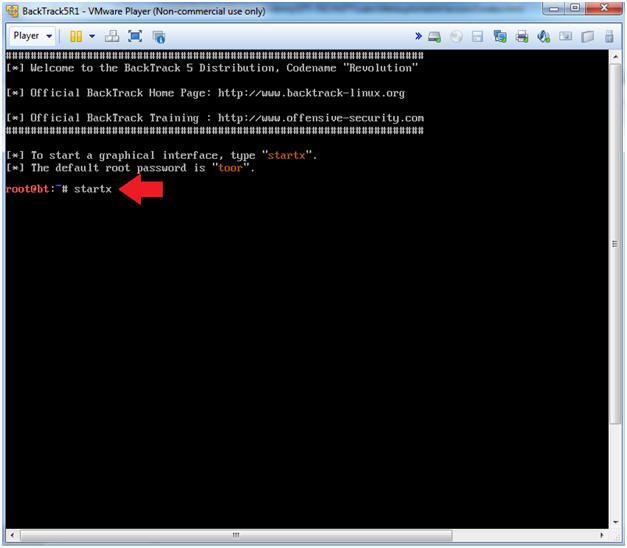
  8. Bring up the GNOME
    • Instructions:
      1. Type startx
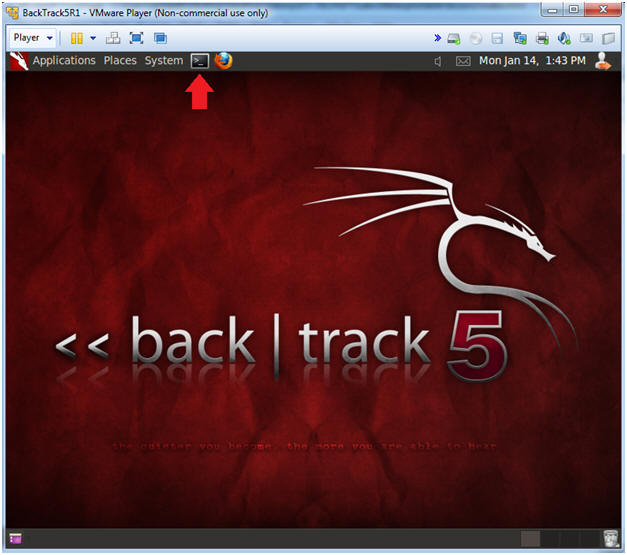
  9. Start up a terminal window
    • Instructions:
      1. Click on the Terminal Window
  10. Obtain the IP Address
    • Instructions:
      1. ifconfig -a
      2. Record your IP Address (See Picture)
    • Note(FYI):
      • My IP address 192.168.1.139.
      • In your case, it will probably be different.
      • This is the machine that will be use to attack the victim machine (Metasploitable).
Section 2: Download bmap
  1. Create bmp folder
    • Instructions:
      1. cd /opt
      2. mkdir bmap
      3. cd bmap
  2. Open Firefox Web Browser
    • Instructions:
      1. Applications --> Internet --> Firefox Web Browser
  3. Navigate to bmap
  4. Save bmap
    • Instructions:
      1. Click on File System
      2. Navigate to /opt/bmap
      3. Click Save
  5. Unzip and Untar bmap
    • Instructions:
      1. cd /opt/bmap
      2. ls -l
      3. gunzip bmap-1.0.17.tar.gz
      4. tar xovf bmap-1.0.17.tar
  6. make bmap
    • Instructions:
      1. cd /opt/bmap/bmap-1.0.17
      2. make
        • The purpose of the make utility is to determine automatically which pieces of a large program need to be recompiled, and issue the commands to recompile them.
    • Note(FYI):
      1. You will see a lot of warnings.  However, make will compile bmap.
  7. make bmap
    • Instructions:
      1. ln -s /opt/bmap/bmap-1.0.17/bmap /sbin/bmap
        • "ln -s", makes a link to the bmap command in the /sbin.
        • /sbin is typically a default directory found in the $PATH variable.
      2. which bmap
      3. bmap -help

Section 3: Create Test File
  1. Create Test File
    • Instructions:
      1. cd /var/tmp
      2. echo "This is a test file" > test.txt
      3. cat test.txt
Section 4: Using bmap to hide text in slack space
  1. Show Slack Space
    • Instructions:
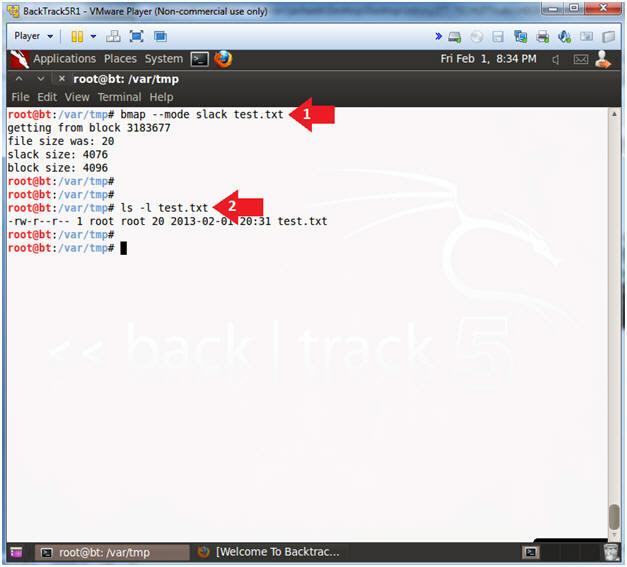
      1. bmap --mode slack test.txt
      2. ls -l test.txt
    • Note(FYI):
      1. The test.txt file is using 20 bytes of disk space.
      2. The test.txt file has 4076 bytes of "unused" slack space.
  2. Hide Data in Slack Space
    • Instructions:
      1. echo "Top Secret Data Goes Here" | bmap --mode putslack test.txt
      2. ls -l test
        • Notice the 20 byte size did not change after test was added to its slack space.
      3. cat test.txt
        • Notice the secret message is not present.
      4. strings test.txt
        • Not even strings can reach into the slack space of test.txt.
Section 5: Proof of Lab
  1. Proof of Lab
    • Note(FYI):
      • The following commands will be placed in the lower terminal window.
    • Instructions
      1. rm test.txt
      2. ls -l test.txt
      3. echo "This is a test file" > test.txt
      4. bmap --mode slack test.txt
        • Notice the secret message was still present after the file was deleted and re-created.
      5. echo "Your Name"
        • Replace the string "Your Name" with your actual name.
        • e.g., echo "John Gray"
    • Proof Of Lab Instructions:
      1. Do a PrtScn of the below commands
      2. Paste into a word document
      3. Upload to Moodle


Helix to Hard Drive

(Helix)

{ Install Helix Linux Image to Hard drive  }

Section 0. Background Information
  • Helix3 is a Live CD built on top of Ubuntu. It focuses on incident response and computer forensics. According to Helix3 Support Forum, e-fense is no longer planning on updating the free version of Helix.
  • See http://www.e-fense.com/products.php

Section 1. Downloading Helix
  1. On any machine connected to the Internet, bring up a Web Browser.
    • In my case, I am using a Windows Machine that has a USB hard drive attached to it.
  2. Go To http://helix.onofri.org/Helix2008R1.iso
  3. Saving the ISO
    • Command:  Click Save
  4. Saving ISO to a location
    • Instruction: It's up to you where you want to save the file.  In my case, I will save the ISO to H:\BOOT ISO

Section 2. Create a New Virtual Machine
  1. Create a New Virtual Machine
    • Command: Click on "Create a New Virtual Machine"
  2. New Virtual Machine Wizard
    • Instructions
      1. Click on the "I will install the operating system later" radio button.
      2. Click Next.
  3. Customer Operating System and Version
    • Instructions
      1. Guest operating system: Linux
      2. Version: Ubuntu
      3. Click Next.
  4. Personalize Linux
    • Instructions
      1. Virtual machine name: TargetHelix01
        • Note: Name it whatever you like.
      2. Location: H:\TargetHelix01
        • Note: If you can, save this image to a USB Hard drive.
      3. Click Next.
  5. Personalize Linux
    • Instructions
      1. Maximum disk size (GB): 15
        • Note: You can make this a little as 3.5 GB.  It really depends if you instead on analyzing images with Autopsy.
      2. Click on the "Store virtual disk as a single file"
      3. Click Next.
  6. Personalize Linux
    • Instructions
      • Click Finished
    • Note
      • Helix will now boot off of the Helix2008R1.iso.

Section 3. Install Helix to the Hard drive (Part 1)
  • Warning:  Step 10 will fail.  Unfortunately, you will have to go through the install steps twice, due to an os-prober issue that has trouble seeing the logical volumes.  So, don't get frustrated and just follow along step by step.
  1. Edit TargetHelix01 Virtual Machine
    • Command: Click Edit virtual machine settings
  2. Virtual Machine Settings
    • Command:
      1. Select CD/DVD (IDE)
      2. Select the "Use ISO image file:" radio button.
      3. Browse to where you saved the Helix2008R1.iso
      4. Select OK.
  3. Booting from Helix Options
    • Instructions:
      1. Select TargetHelix01
      2. Play Virtual Machine
  4. Boot into the Helix Live CD
    • Command:
      1. Arrow Down to "Boot into the Helix Live CD"
      2. Press Enter
  5. Install to Hard drive (Part 1)
    • Instructions:
      • System --> Administration --> Install
  6. Language Selection
    • Instructions:
      1. English
      2. Forward
  7. Timezone Selection
    • Instructions:
      1. Select City: Chicago
      2. Forward
  8. Keyboard layout
    • Instructions:
      1. Which layout is most similar to your keyboard? USA
      2. USA
      3. Forward
  9. Prepare disk space
    • Instructions:
      1. Make sure Guided - use entire disk is selected.
      2. Forward
  10. Who are you?
    • Instructions:
      1. What is your name? student
      2. What name do you want to use to log in? student
      3. Choose a password
      4. What is the name of this computer? TargetHelix01
      5. Forward
    • Warning Instructions:
      1. After pressing forward the os-prober will fail because it cannot the volume groups.
      2. Click Cancel
        • I realize you are saying what the hell, but please continue to follow along to get Helix to install to disk.
  11. Abort the installation?
    • Instructions:
      • Click on Quit
    • Notes: I know this sounds crazy, but continue to Section 4.

Section 4. Install Helix to the Hard drive (Part 2)
  1. Install to Hard drive (Part 2)
    • Instructions:
      • System --> Administration --> Install
  2. Language Selection
    • Instructions:
      1. English
      2. Forward
  3. Timezone Selection
    • Instructions:
      1. Select City: Chicago
      2. Forward
  4. Keyboard layout
    • Instructions:
      1. Which layout is most similar to your keyboard? USA
      2. USA
      3. Forward
  5. Prepare disk space
    • Instructions:
      1. Make sure Guided - use entire disk is selected.
      2. Forward
  6. Ready to Install
    • Instructions:
      • Click Install
    • Side Note:
      • See, I am not crazy, it works a second time.  BTW, I discovered this trick by scavenging through many of websites and blogs.
  7. Installing system
    • Side Note:  This process will take between 10 to 20 minutes.
  8. Post Installation
    • Command:  Click on Continue using the Live CD
  9. Adjust VMware Settings (For VMWare Only, See Below)
    • Command:  Click on VMware Settings.
  10. Change Physical Drive (For VMWare Only, See Below)
    • Command
      1. Select CD/DVD (IDE)
      2. Select the "Use physical drive:" Connection radio button.
  11. Change Network Adapter (For VMWare Only, See Below)
    • Command
      1. Select Network Adapter NAT
      2. Select the "Bridged: Connected directly to the physical network" Network Connection radio button.
  12. Consistency Reboot
    • Command
      1. Click on the Terminal Console
      2. sudo su -
      3. shutdown -r now
Section 5. Logging Into TargetHelix01
  1. Preview system information
    • Command:
      1. Login with your the username and password you created earlier.
      2. In my case, I create a username called "student".
  2. How to become root
    • Command:
      1. sudo su -
      2. Enter your current password for the account your logged in as.
  3. Proof of Lab
    • Command:
      1. echo "Your Name"; date; df -h
      2. Do an Alt PrtScn (Print Screen)
      3. Cut and Paste into a Word Document
      4. Upload to Moodle.
Section: Proof of Lab
  1. Cut and Paste a screen shot found in Section 5, Step 3 in a word and upload to Moodle.