Saturday 18 April 2020

CheckSum

(CheckSum: Marxio File Checksum)

{ Comparing checksum between two files }

Background Information
  • What is a file checksum?
    • A checksum or hash sum is used to check the integrity of the data inside of a file.  This file can be a regular text file, image, executable, or etc.
    • If the checksum published with a download file or by a person matches the checksum performed on the file of concern, then there is a good changed the data was not altered.
  • What is Marxio File Checksum?
    • This program calculates and verify checksums of files downloaded received in email, upload from server, and downloaded from the internet. It supports major checksum types: CRC32, MD4, MD5, SHA1, SHA-256, SHA-384, SHA-512, RIPEMD-128, RIPEMD-160, HAVAL 256, TIGER 192.
  • Resources
    • Unfortunately, development was discontinued on this tool.
Prerequisite: You Must Complete the QuickStego Lab
  1. *** Lab Prerequisite ***
    • NOTE: Do not continue if you have not completed the QuickStego lab.
  2. On Your Instructor VM
    • Navigate your Windows Explorer to C:\tools\Stego\
    • If you have not completed the QuickStego Lab, Click Here Before you Continue.

    • Remember that image file horse.bmp does NOT contain embedded text, and horse2.bmp DOES contain embedded text.

    • Notice:  These files are the same byte size (835 KB).
Download Marxio-FCV
  1. Login to your Instructor VM, as username administrator
    • For those of you that do not have access to my class, Instructor VM is a Windows XP Operating System.
  2. On the Instructor VM,
  3. Click on Save (See Below).
  4. Save to C:\tools\CheckSum

Section 1: Run Marxio-FCV.exe
  1. Using Windows Explorer Navigator to C:\tools\CheckSum
    • Double Click on Marxio-FCV.exe
  2. Click on Run
  3. Click on Accept License Agreement
  4. Click on OK
  5. Click On NO
  6. Click OK


Section 2: Comparing CheckSums with Marxio
  1. Click on the Folder in the red rectangle (See Below).
  2. Select horse.bmp
    • Click on Open
  3. Viewing the CheckSum
    • After opening the file, the checksum will automatically be calculated.
  4. Highlight the checksum, and click copy.
  5. Paste the Checksum you just copied into the "Compare with:" textbox.
  6. Now we will open up horse2.bmp to compare its' checksum with horse1.bmp.
    • Click on the folder within the red rectangle.
  7. Select horse2.bmp
    • Click Open.
  8. Notice the Red X, indicates the file checksums do not match.
Proof of Lab
  1. On the Instructor VM
  2. Do a screen print, with the Marxio-FCV.ini highlighted.
    • It is necessary that Date Modified is displayed.
  3. Paste to a word document
  4. Submit to Moodle.

CN LAB

Character Stuffing

 // PROGRAM FOR CHARACTER STUFFING  
 #include<stdio.h>  
 #include<conio.h>  
 #include<string.h>  
 void main()  
 {  
 int i,j=1;  
 char str1[100], str2[100], str3[100];  
 //clrscr();  
 printf("Enter a string: ");  
 scanf("%s",&str1);  
 //GENERATING ENCODED MESSAGE  
 str2[0] = '@';  
 for(i=0; i< strlen(str1); i++)  
 {  
 if( str1[i]=='@' || str1[i] == '#')  
 {  
 str2[j] = '#'; j++;  
 }  
 str2[j] = str1[i]; j++;  
 }  
 str2[j] = '@'; j++;  
 str2[j] = '\0';  
 printf("Encoded message is: %s", str2);  
 // DECODED MESSAGE or ACTUAL MESSAGE  
 j=0;  
 for(i=1; i<(strlen(str2)-1);i++)  
 {  
 if(str2[i]=='#')  
 i++;  
 str3[j]=str2[i];  
 j++;  
 }  
 str3[j] ='\0';  
 printf("\nDecoded or actual message is: %s", str3);  
 getch();  
 }  

Bit Stuffing

 //PROGRAM FOR BIT-STUFFING   
 #include<stdio.h>  
 #include <string.h>  
 int main()  
 {  
   char ed[100]; //ed - Entered Data  
   char ta[100]; //ta - Temporary Array  
   char dd[100]; //dd - Decoded Data  
   char ecd[100]={'0','1','1','1','1','1','1','0'}; //ecd - EnCoded Data  
   int n, i, j=0, count=0;  
   printf("Enter the string:");  
   scanf("%s",&ed);  
   printf("\nEntered bit pattern: %s",ed);  
 //ENCODING  
   for(i=0; i<strlen(ed); i++)  
   {  
     if(ed[i]=='1')  
       count++;  
     else  
       count = 0;  
     ta[j]=ed[i]; j++;  
     if(count==5)  
     {  
       ta[j] = '0';  
       j++;  
       count = 0;  
     }  
   }  
   ta[j] = '\0';  
   strcat(ta,ecd);  
   strcat(ecd,ta);  
   printf("\nEncoded Data: %s",ecd);  
 //DECODING  
   j=0; count =0;  
   for(i=8; i<strlen(ecd)-8; i++)  
   {  
     if(ecd[i]=='1')  
       count ++;  
     else  
       count = 0;  
     dd[j] = ecd[i]; j++;  
     if(count==5)  
     {  
       i++;  
       count=0;  
     }  
   }  
   dd[j] ='\0';  
   printf("\nDecoded Data: %s", dd);  
   return 0;  
 }  

Cyclic Redundancy Check

=> A Generator is shared between the Sender and the Receiver.  
=> Sender will convert Dataword into Codeword using the Generator and send it 
 to the Receiver.  
=> Receiver upon receiving the Codeword, will check for errors in the received 
 Codeword with the help of the Generator. 
=> If no error is found, receiver can extract Dataword from the Codeword.  
 
Sender Side:

 Generator/Divisor: 1100000001011 (Total 13-bits)  
 Dataword: 10101 (5-bits)  
 Extended Dataword: 10101000000000000 (17-bits: Dataword + 12 0's)  
 
1100000001011 ) 10101000000000000 ( 11001  
                1100000001011  
                _____________  
                x1101000010110  
                 1100000001011  
                 _____________  
                 x0010000111010  
                  0000000000000  
                  _____________  
                  x0100001110100  
                   0000000000000  
                   _____________  
                   x1000011101000  
                    1100000001011  
                    _____________  
                    x100011100011  
 
=> So, CRC Bits are: 100011100011  
=> Now Codeword is 10101100001110100 (17-bits: Dataword + CRC bits)  
=> Sender will send this Codeword to the Receiver.  

 Receiver Side:  

 Codeword: 10101100011100011  
 Generator/Divisor: 1100000001011 
 
  1100000001011)   10101100011100011 ( 11001  
                  1100000001011  
                  _____________  
                  x1101100001010  
                   1100000001011  
                   _____________  
                   x0011000000010  
                    0000000000000  
                    _____________  
                    x0110000000101  
                     0000000000000  
                     _____________  
                     x1100000001011  
                      1100000001011  
                      _____________  
                      0000000000000  
 
 => Reached Codeword contain no errors and now extract Dataword from Codeword  
 => Dataword is 10101 [[by removing (Generator_Size - 1) bits from Codeword from Right]]  
 
 // PROGRAM FOR CYCLIC REDUNDANCY CHECK  
 #include<stdio.h>  
 int main()  
 {  
   int ds, dws, i, j, k, c=0; // ds-DivisorSize: dws-DataWordSize:  
   int div[100], dw[100], ta[100]; // div-Divisor: dw-DataWord: ta-TemporaryArray  
   //TAKING INPUT - DIVISOR  
   printf("Enter the size of divisor: ");  
   scanf("%d", &ds);  
   printf("Enter the divisor in bit pattern: ");  
   for(i=0; i<ds ; i++)  
     scanf("%d", &div[i]);  
   //TAKING INPUT - DATAWORD  
   printf("Enter the size of the DataWord: ");  
   scanf("%d",&dws);  
   printf("Enter the DATAWORD in bit pattern: ");  
   for(i=0; i<dws; i++)  
     scanf("%d",&dw[i]);  
   //ADDING ZEROS TO THE DATAWORD i.e., WE GOT EXTENDED DATAWORD HERE  
   for(i=dws; i<(dws+ds-1); i++)  
     dw[i] = 0;  
   //PRINTING THE EXTENDED DATAWORD  
   printf("Data after inserting zeros or <EXTENDED DATAWORD> : ");  
   for(i=0; i<(dws+ds-1); i++)  
     printf("%d", dw[i]);  
   //COPYING DATAWORD INTO TEMPORARY ARRAY  
   for(i=0; i<(dws+ds-1); i++)  
     ta[i] = dw[i];  
   //GENERATING THE REDUNDANT BITS  
   for(i=0; i!= dws; i++)  
   {  
     if(ta[i]==1)  
       for(j=0, k=i; j<ds; j++, k++)  
          ta[k] = ta[k]^div[j];   
   }  
   //ADDING REDUNDANT BITS TO THE DATAWORD  
   for(i=dws; i<(dws+ds-1); i++)  
     dw[i] = ta[i];  
   //PRINTING THE CODEWORD  
   printf("\n\nThe Generated CODEWORD is: ");  
   for(i=0; i<(dws+ds-1); i++)  
     printf("%d", dw[i]);  
   //COPYING CODEWORD INTO TEMPORARY ARRAY  
   for(i=0; i<(dws+ds-1); i++)  
     ta[i] = dw[i];  
   //DIVIDING CODEWORD WITH DIVISOR AT RECEIVERS END  
   for(i=0; i!= dws; i++)  
   {  
     if(ta[i]==1)  
       for(j=0, k=i; j<ds; j++, k++)  
         ta[k] = ta[k]^div[j];   
   }  
   printf("\nThe Remainder @ receiver's End is: ");  
   for(i=dws; i<(dws+ds-1); i++)  
       printf("%d",ta[i]);  
 //CHECKING IF THERE ARE ANY 1s IN THE REMAINDER  
   for(i=dws; i<(dws+ds-1); i++)  
   {  
     if(ta[i]!=0)  
       c++;  
   }  
   if(c==0)  
     printf("\nThe Codeword hasn't been altered::Message sent SUCCESSFULLY :)");  
   else  
     printf("\nThe Codeword has been altered :(");  
   return 0; 
 }  
 /* EXAMPLE OUTPUT  
 Enter the size of divisor: 4  
 Enter the divisor in bit pattern: 1 0 1 1  
 Enter the size of the DataWord: 5  
 Enter the DataWord in bit pattern: 1 0 1 1 1  
 Data after inserting zeros or <EXTENDED DATAWORD> : 10111000  
 The Generated CODEWORD is: 10111011  
 The Remainder @ receiver's End is: 000  
 The Codeword hasn't been altered::Message sent SUCCESSFULLY :)  
 */  

Dijkstra's Algorithm

 //PROGRAM FOR DIJKSTRA'S ALGORITHM  
 #include <stdio.h>  
 #include <conio.h>  
 #define GRAPHSIZE 2048  
 #define INFINITY GRAPHSIZE*GRAPHSIZE  
 #define MAX(a, b) ((a > b) ? (a) : (b))  
 int e; /* The number of nonzero edges in the graph */  
 int n; /* The number of nodes in the graph */  
 long dist[GRAPHSIZE][GRAPHSIZE]; /* dist[i][j] is the distance between node i and j; 
 or 0 if there is no direct connection */  
 long d[GRAPHSIZE]; 
 /* d[i] is the length of the shortest path between the source (s) and node i */  
 int prev[GRAPHSIZE]; /* prev[i] is the node that comes right before i in 
 the shortest path from the source to i*/  
 void printD() {  
      int i;  
      printf("Distances:\n");  
      for (i = 1; i <= n; ++i)  
           printf("%d\t", i);  
      printf("\n");  
      for (i = 1; i <= n; ++i) {  
           printf("%ld\t", d[i]);  
      }  
      printf("\n");  
 }  
 /* Prints the shortest path from the source to dest.  
  * dijkstra(int) MUST be run at least once BEFORE this is called */  
 void printPath(int dest) {  
      if (prev[dest] != -1)  
           printPath(prev[dest]);  
      printf("%d ", dest);  
 }  
 void dijkstra(int s) {  
      int i, k, mini;  
      int visited[GRAPHSIZE];  
      for (i = 1; i <= n; ++i) {  
           d[i] = INFINITY;  
           prev[i] = -1; /* no path has yet been found to i */  
           visited[i] = 0; /* the i-th element has not yet been visited */  
      }  
      d[s] = 0;  
      for (k = 1; k <= n; ++k) {  
           mini = -1;  
           for (i = 1; i <= n; ++i)  
                if (!visited[i] && ((mini == -1) || (d[i] < d[mini])))  
                     mini = i;  
           visited[mini] = 1;  
           for (i = 1; i <= n; ++i)  
                if (dist[mini][i])  
                     if (d[mini] + dist[mini][i] < d[i])  
                     {  
                          d[i] = d[mini] + dist[mini][i];  
                          prev[i] = mini;  
                     }  
      }  
 }  
 void main() {  
      int i, j;  
      int u, v, w;  
   //clrscr();  
      FILE *fin = fopen("dist.txt", "r");  
      fscanf(fin, "%d", &e);  
      for (i = 0; i < e; ++i)  
           for (j = 0; j < e; ++j)  
                dist[i][j] = 0;  
      n = -1;  
      for (i = 0; i < e; ++i) {  
           fscanf(fin, "%d%d%d", &u, &v, &w);  
           dist[u][v] = w;  
           n = MAX(u, MAX(v, n));  
      }  
      fclose(fin);  
      dijkstra(1);  
      printD();  
      printf("\n");  
      for (i = 1; i <= n; ++i) {  
           printf("Path to %d: ", i);  
           printPath(i);  
           printf("\n");  
      }  
      getch();  
 }  
 /*SAMPLE OUTPUT  
 ____________________  
 inputfile: dist.txt  
 10  
 1 2 10  
 1 4 5  
 2 3 1  
 2 4 3  
 3 5 6  
 4 2 2  
 4 3 9  
 4 5 2  
 5 1 7  
 5 3 4 
 _____________________  
 
 OUTPUT  
 Distances:  
 1  2  3  4  5  
 0  7  8  5  7  
 Path to 1: 1  
 Path to 2: 1 4 2  
 Path to 3: 1 4 2 3  
 Path to 4: 1 4  
 Path to 5: 1 4 5  
 */  

Distance Vector Routing Algorithm

 //PROGRAM FOR DISTANCE VECTOR ROUTING ALGORITHM  
 #include<stdio.h>  
 #include<conio.h>  
 struct node  
 {  
   unsigned dist[20];  
   unsigned from[20];  
 }rt[10];  
 int main()  
 {  
   int dmat[20][20];  
   int n,i,j,k,count=0;  
   printf("\nEnter number of nodes : ");  
   scanf("%d",&n);  
   printf("\nEnter the cost matrix :\n");  
   for(i=0;i<n;i++)  
     for(j=0;j<n;j++)  
     {  
       scanf("%d",&dmat[i][j]);  
       dmat[i][i]=0;  
       rt[i].dist[j]=dmat[i][j];  
       rt[i].from[j]=j;  
     }  
   do  
   {  
     count=0;  
     for(i=0;i<n;i++)  
       for(j=0;j<n;j++)  
         for(k=0;k<n;k++)  
           if(rt[i].dist[j]>dmat[i][k]+rt[k].dist[j])  
           {  
             rt[i].dist[j]=rt[i].dist[k]+rt[k].dist[j];  
             rt[i].from[j]=k;  
             count++;  
           }  
   }while(count!=0);  
   for(i=0;i<n;i++)  
   {  
       printf("\n\nNODE %d ROUTING TABLE",i+1);  
       printf("\nNode\tDistance\tViaNode\n");  
       for(j=0;j<n;j++)  
       {  
         printf("\t\n %d\t  %d\t\t %d",j+1,rt[i].dist[j],rt[i].from[j]+1);  
       }  
   }  
   printf("\n\n");  
      return 0;  
   getch();  
 }    
 /*SAMPLE OUTPUT
**********INPUT*********
Enter number of nodes : 5
Enter the cost matrix :
0  4  2  6  99
4  0  99 99 99
2  99 0  3  99
6  99 3  0  2
99 99 99 2  0

 ::::::OUTPUT ::::: 
NODE 1 ROUTING TABLE  
 Node  Distance    ViaNode  
  1    0       1  
  2    4       2  
  3    2       3  
  4    5       3  
  5    7       4  
 NODE 2 ROUTING TABLE  
 Node  Distance    ViaNode  
  1    4       1  
  2    0       2  
  3    6       1  
  4    9       1  
  5    11      1  
 NODE 3 ROUTING TABLE  
 Node  Distance    ViaNode  
  1    2       1  
  2    6       1  
  3    0       3  
  4    3       4  
  5    5       4  
 NODE 4 ROUTING TABLE  
 Node  Distance    ViaNode  
  1    5       3  
  2    9       1  
  3    3       3  
  4    0       4  
  5    2       5  
 NODE 5 ROUTING TABLE  
 Node  Distance    ViaNode  
  1    7       4  
  2    11      4  
  3    5       4  
  4    2       4  
  5    0       5  

RSA Algorithm

 //RSA ALGORITHM  
 #include <stdio.h>  
 int modulo(int e, int n, int pt)  
 {  
   int h;  
   if(e==0)  
     return 1;  
   else if(e==1)  
     return pt%n;  
   else  
   {  
     h = modulo(e/2, n, pt);  
     if(e%2==0)  
       return ((h*h)%n)%n;  
     else  
       return ((h*h)*(pt%n))%n;  
   }  
 }  
 int main()  
 {  
   int p, q, n, z, e, d, pt,ct;  
   printf("Enter p & q values <prime numbers>: ");  
   scanf("%d%d", &p, &q);  
   n = p*q;  
   z = (p-1)*(q-1);  
   printf("\nEnter a relative prime number to %d i.e., e value: ",z);  
   scanf("%d", &e);  
   d = 1;  
   while((d*e)%z!=1)  
     d++;  
   printf("d value is: %d\n", d);  
   printf("Keys are: <e, n>:(%d, %d)\t<d, n>:(%d, %d)",e,n,d,n);  
   printf("\n\nEnter message<pt> such that pt < %d : ",n);  
   scanf("%d", &pt);  
   ct = modulo(e,n,pt);  
   printf("\nCipher Text: %d\n",ct);  
   pt = modulo(d,n,ct);  
   printf("Decrypted Text: %d",pt);  
   return 0;  
 }  
 /*  SAMPLE OUTPUT
 Enter p & q values <prime numbers>: 11 7  
 Enter a relative prime number to 60 i.e., e value: 13  
 d value is: 37  
 Keys are: <e, n>:(13, 77)    <d, n>:(37, 77)  
 Enter message<pt> such that pt < 77 : 5  
 Cipher Text: 26  
 Decrypted Text: 5  
 */  

Helix

ComputerSecurityStudent (CSS)

(Helix: Lesson 4)

{ Dump Window's Physical Memory Using NetCat to BackTrack  }

Section 0. Background Information
  1. Helix3 is a Live CD built on top of Ubuntu. It focuses on incident response and computer forensics. According to Helix3 Support Forum, e-fense is no longer planning on updating the free version of Helix.
  2. Pre-Requisite Lesson  
  3. Lab Notes
    • In this lab we will do the following:
      1. Download Helix2008R1.iso
      2. Start Netcat Listener on BackTrack
      3. Open Notepad, Solitaire and Internet Explorer
      4. Acquired a physical memory dump from Damn Vulnerable WXP-SP2 using Helix.
      5. Use a Netcat Listener on BackTrack to Capture the Helix Memory Dump
  4. Next Lesson
  5. Legal Disclaimer
    • As a condition of your use of this Web site, you warrant to computersecuritystudent.com that you will not use this Web site for any purpose that is unlawful or that is prohibited by these terms, conditions, and notices.
    • In accordance with UCC § 2-316, this product is provided with "no warranties, either express or implied." The information contained is provided "as-is", with "no guarantee of merchantability."
    • In addition, this is a teaching website that does not condone malicious behavior of any kind.
    • Your are on notice, that continuing and/or using this lab outside your "own" test environment is considered malicious and is against the law.
    • © 2012 No content replication of any kind is allowed without express written permission.
Section 1: Download Helix
  1. Open Firefox on your (Host Windows Machine).
    • Instructions:
      1. Click the Start Button
      2. Type "Firefox" in the search box
      3. Click on Mozilla Firefox
  2. Download Helix2008R1.iso
    • Instructions:
      1. Navigate to the following Link
        • http://helix.onofri.org/Helix2008R1.iso
      2. Click the Save File radio button
      3. Click the OK button
  3. Save Helix2008R1.iso
    • Instructions:
      1. Navigate the following Download Location
        • C:\ISOs or USB:\ISOs
        • Note: In my case, I am using a USB Drive (G:)
      2. File name: Helix2008R1
      3. Save as types: ISO Image File
      4. Click the Save button
Section 2: Start Up BackTrack Machine
  1. Open VMware Player on your (Host Windows Machine).
    • Instructions:
      1. Click the Start Button
      2. Type "vmware player" in the search box
      3. Click on VMware Player
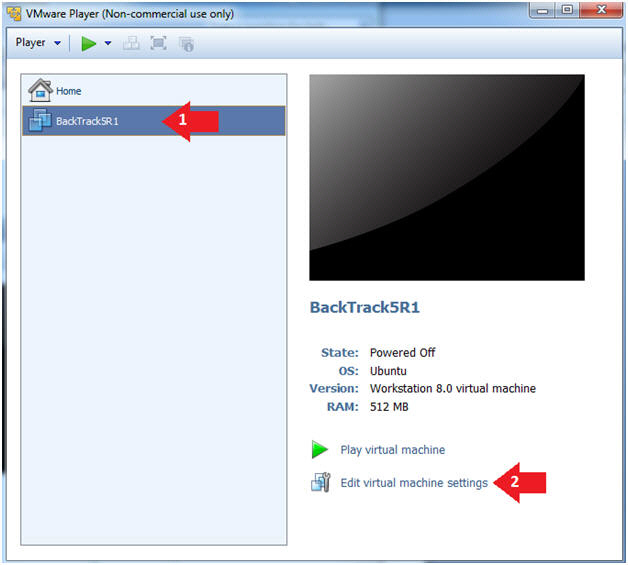
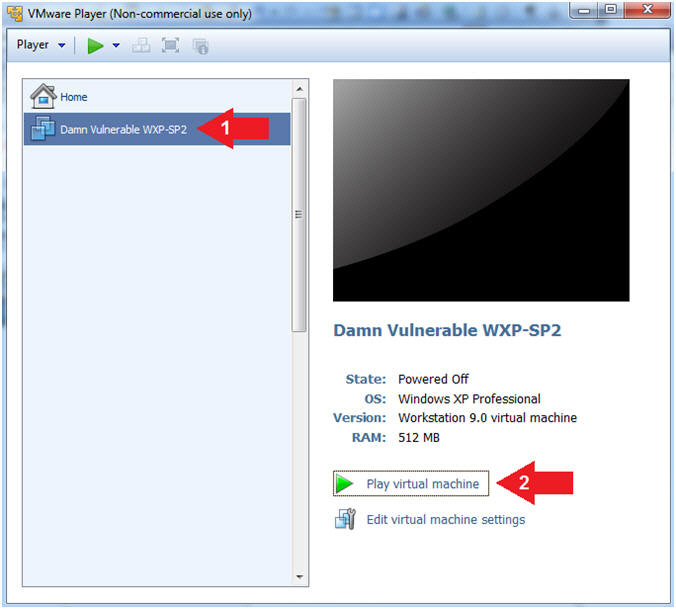
  2. Edit the BackTrack5R1 VM
    • Instructions:
      1. Select BackTrack5R1 VM
      2. Click Edit virtual machine settings
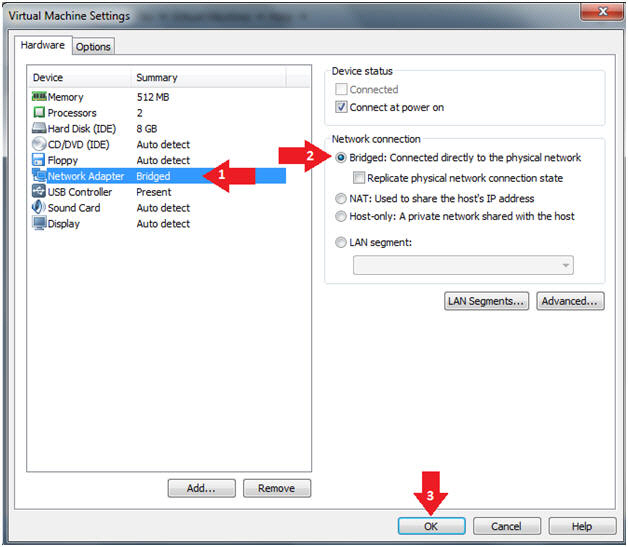
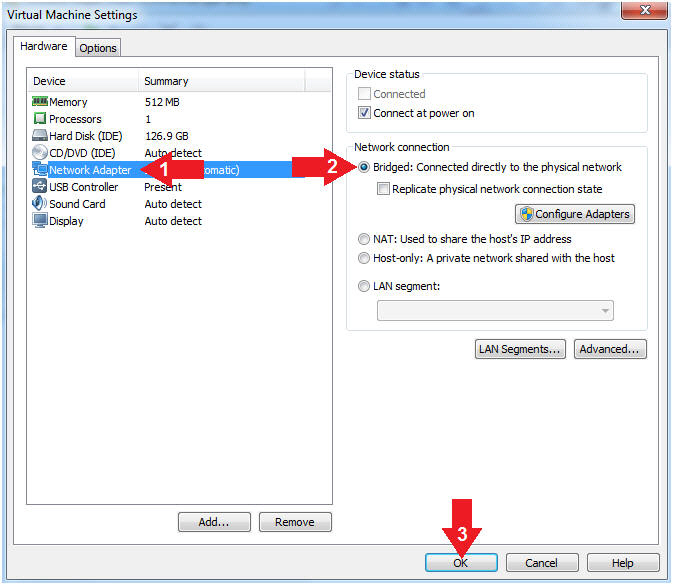
  3. Edit Virtual Machine Settings
    • Instructions:
      1. Click on Network Adapter
      2. Click on the Bridged Radio button
      3. Click on the OK Button
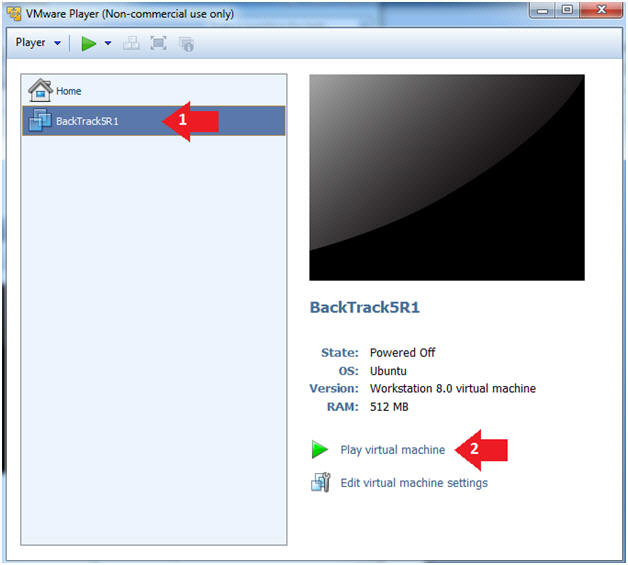
  4. Play the BackTrack5R1 VM
    • Instructions:
      1. Click on the BackTrack5R1 VM
      2. Click on Play virtual machine
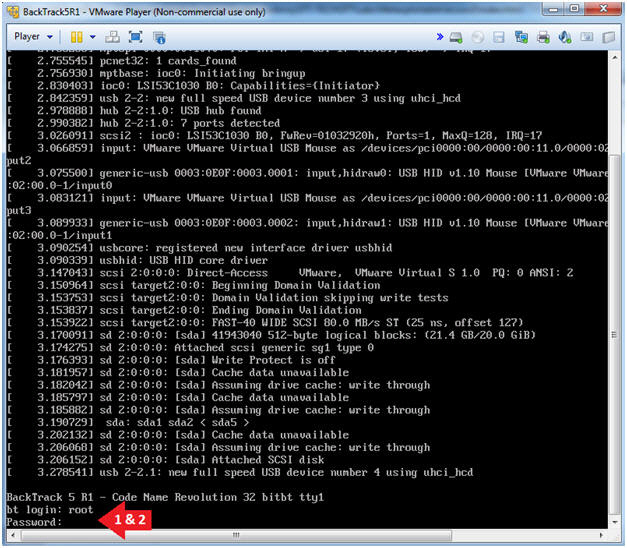
  5. Login to BackTrack
    • Instructions:
      1. Login: root
      2. Password: toor or <whatever you changed it to>.
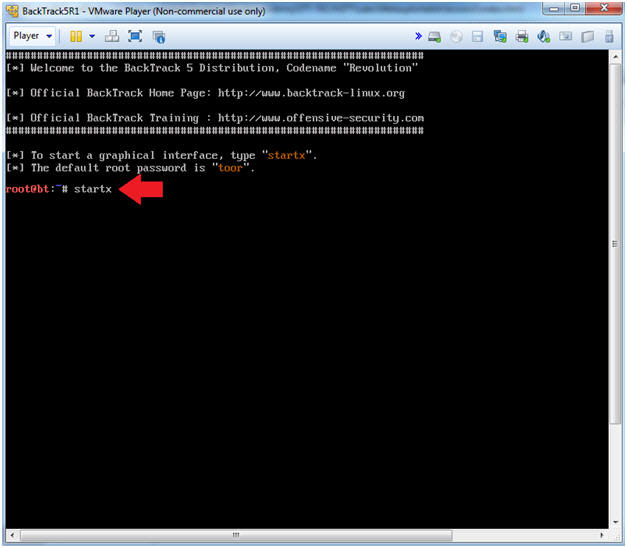
  6. Bring up the GNOME
    • Instructions:
      1. Type startx
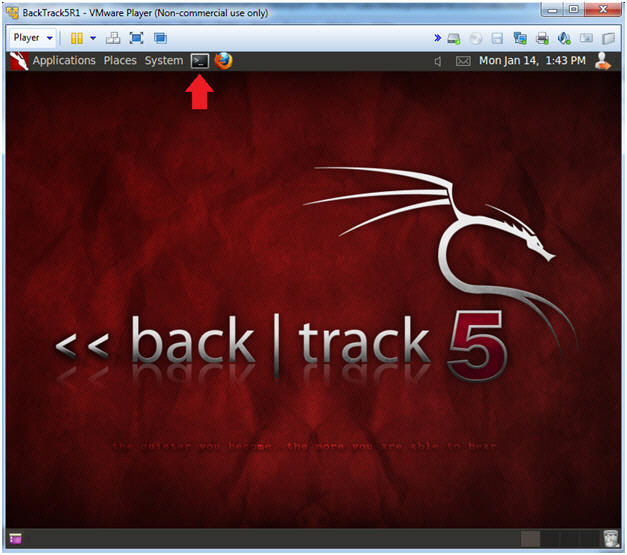
  7. Start up a terminal window
    • Instructions:
      1. Click on the Terminal Window
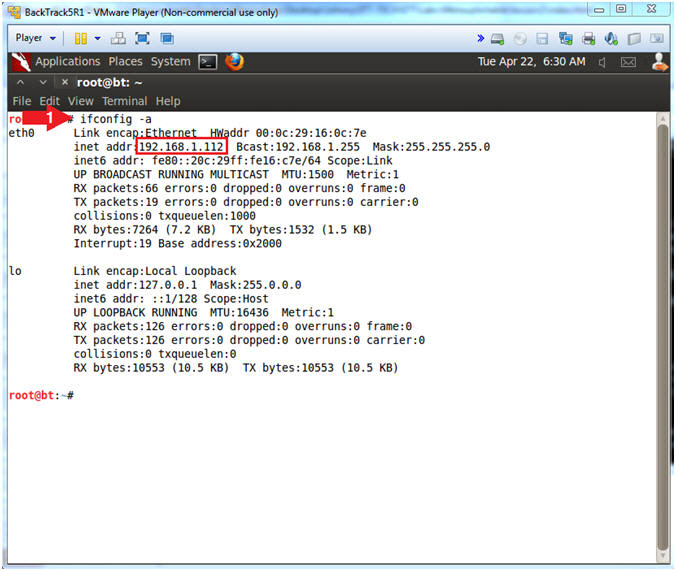
  8. Obtain the IP Address
    • Instructions:
      1. ifconfig -a
    • Note(FYI):
      • My IP address 192.168.1.112.
      • In your case, it will probably be different.
      • This is the machine that will be use to attack the victim machine (Metasploitable).
  9. Start Up Netcat on BackTrack
    • Instructions:
      1. mkdir -p /var/forensics/images
        • If you have already Completed Autopsy Lesson 1, then this directory should already exist.
      2. cd /var/forensics/images
      3. nc -l -vvv -p 8888 > WV01_clean.dd
        • Netcat will listen for Helix to send the Memory Image.

Section 3: Start Up Damn Vulnerable WXP-SP2
  1. Open VMware Player on your (Host Windows Machine).
    • Instructions:
      1. Click the Start Button
      2. Type "vmware player" in the search box
      3. Click on VMware Player
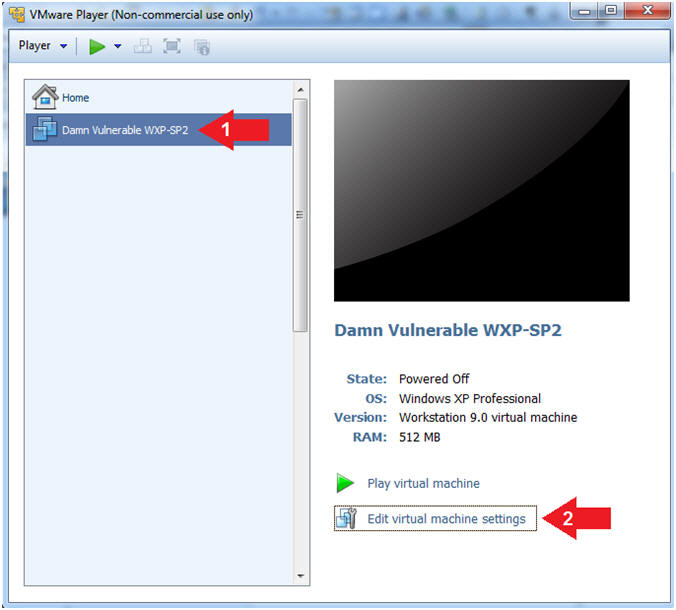
  2. Edit Virtual Machine Settings
    • Instructions:
      1. Click on Damn Vulnerable WXP-SP2
      2. Edit Virtual Machine Settings
    • Note:
      • Before beginning a lesson it is necessary to check the following VM settings.
  3. Set Network Adapter
    • Instructions:
      1. Click on Network Adapter
      2. Click on the radio button "Bridged: Connected directly to the physical network".
      3. Click the OK Button
  4. Start Up Damn Vulnerable WXP-SP2.
    • Instructions:
      1. Start Up your VMware Player
      2. Play virtual machine
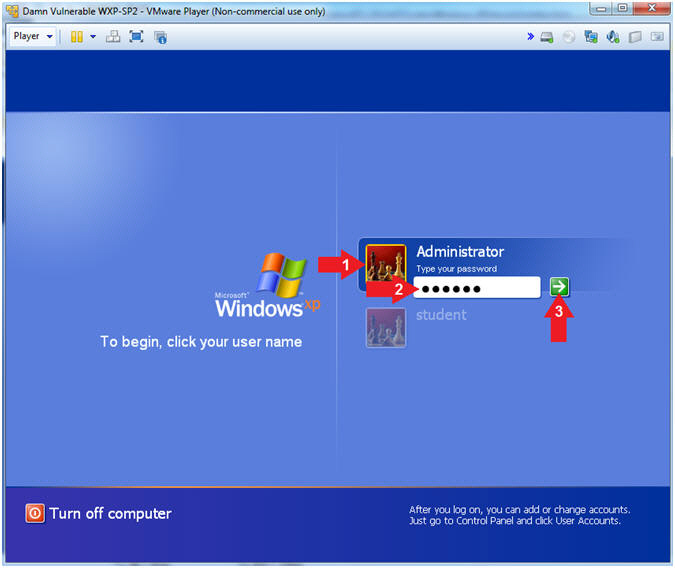
  5. Logging into Damn Vulnerable WXP-SP2.
    • Instructions:
      1. Click on Administrator
      2. Password: Supply Password
        •  (See Note)
      3. Press <Enter> or Click the Arrow
    • Note(FYI):
      1. Password was created in (Lab 1, Section 1, Step 8)
  6. Open the Command Prompt
    • Instructions:
      1. Click the Start Button
      2. All Programs --> Accessories --> Command Prompt
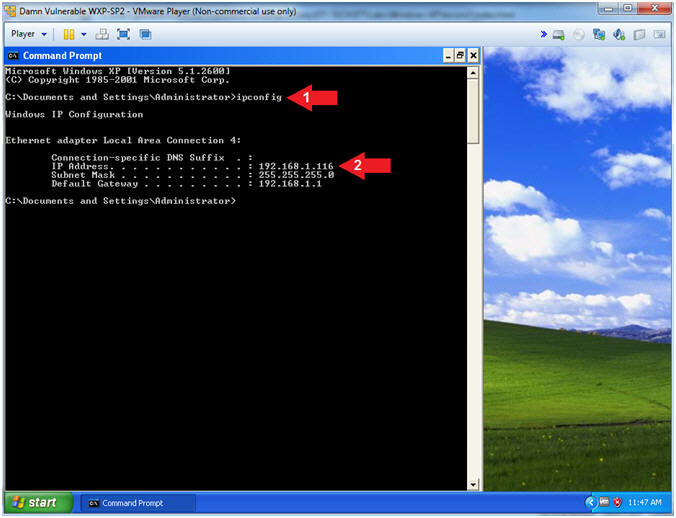
  7. Obtain Damn Vulnerable WXP-SP2's IP Address
    • Instructions:
      1. ipconfig
      2. Record Your IP Address
    • Note(FYI):
      • In my case, Damn Vulnerable WXP-SP2's IP Address 192.168.1.116.
      • This is the IP Address of the Virtual Machine from which we will use Helix to capture a memory dump.
      • Do not close the command prompt.
Section 4: Start Up Notepad, Command Prompt, Solitaire & Internet Explorer
  1. Start Up NotePad
    • Instructions:
      1. Click the Start Button
      2. All Programs --> Accessories --> Notepad
  2. Start Up Solitaire
    • Instructions:
      1. Click the Start Button
      2. All Programs --> Games --> Solitaire
  3. Start Up Internet Explorer
    • Instructions:
      1. Click the Start Button
      2. All Programs --> Internet Explorer
      3. Navigate to http://www.cnn.com
  4. Verifying Applications
    • Note(FYI):
      • The following applications should be running:
        1. Command Prompt
        2. Notepad
        3. Solitaire
        4. Internet Explorer

Section 5: Loading Helix2008R1
  1. Edit Virtual Machine Settings
    • Instructions:
      1. Player --> Manage --> Virtual Machine Settings...
  2. Configure Windows to load the Helix iso as a CD/DVD
    • Instructions
      1. Select CD/DVD (IDE)
      2. Device status: Check Connected
      3. Select the Use ISO image file
      4. Browse to where you saved the Helix iso.
        • Note:  In my case, I save it in the following location:
        • G:\ISOs\Helix2008R1.iso
      5. Click the OK Button
  3. Choose Language
    • Command:
      1. Select English or desired language
      2. Click the Accept Button
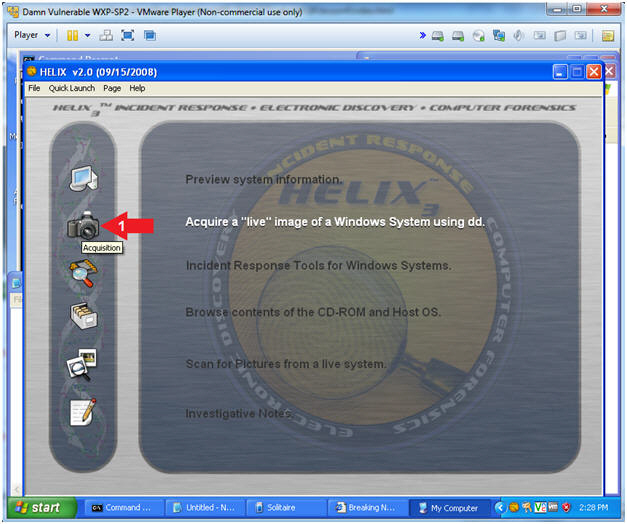
  4. Acquire Live Image (Part 1)
    • Instructions:
      1. Click on the Camera
  5. Acquire Live Image (Part 2)
    • Instructions:
      1. Source: Select Physical Memory
      2. Location Options: Select NetCat
      3. Destination IP:
        • Replace 192.168.1.112 with the BackTrack IP Address you obtained in (Section 2, Step 8).
      4. Port: 8888
      5. Click the Acquire Button
  6. Acquire Live Image (Part 3)
    • Instructions:
      1. Click Yes
  7. Acquire Live Image (Part 4)
    • Note(FYI):
      1. You will see a message that physical memory is being copied.
      2. The Black Screen is close once the copy process if finished.

Section 5: Verify Image was copied to BackTrack
  1. Explaining NetCat Messages
    • Notes(FYI): 
      1. The Red Arrow points to the message that occurs when the Helix Application connects to BackTrack's Netcat Listener.
      2. The Blue Arrow points to BackTrack's NetCat Session that display how many bytes were received from Helix's Memory Dump.

Section 6: Proof of Lab
  1. Proof of Lab
    • Instructions
      1. cd /var/forensics/images
      2. ls -l *.dd
      3. date
      4. echo "Your Name"
    • Proof of Lab Instructions
      1. Press the <Ctrl> and <Alt> key at the same time.
      2. Press the <PrtScn> key.
      3. Paste into a word document
      4. Upload to Moodle

Saturday 28 March 2020

Essentials of Radio Wave Propagation

This book called Essentials of Radio Wave Propagation will be helpful in understanding about wave Propagation.

Click to Download

Embedded_Microcontroller_Interfacing

This book Embedded_Microcontroller_Interfacing_for_M-CORE_Systems will be useful for ECE students as well as EEE.

Click to Download